.png?alt=media&token=391348a2-662a-480e-bc61-c6c0c5cce659)
Technology and Gadgets
Using Json Type In Prisma
- Setup your prisma and express server
- Then create a Post model
	model  Post  {
		id String  @id  @default(auto())  @map("_id")  @db.ObjectId
		title String
		content Json
		createdAt DateTime  @default(now())
		updatedAt DateTime  @updatedAt
	}
- Then we need to add zod validation for content type JSON in order to validate data
	import { z } from  "zod";
	export  const  ContentSchema = z.object({
		label: z.string({ message: "Label is required" }).min(5),
		options: z.array(
		z.object({
		id: z.number(),
		title: z.string({ message: "Title is required" }),
		url: z.string({ message: "Url is required" }),
		})
		),
	});

	export  const  PostSchema = z.object({
		title: z.string({ message: "Title is required" }).min(5),
		content: ContentSchema,
	});
- After that in a route we can validate and store the data in db
	app.post("/api/posts", async (req: Request, res: Response) => {

	try {
		const  payload = PostSchema.safeParse(req.body);
		if (!payload.success) {
		return  res.status(400).json({ errors: payload.error.flatten() });
		}
		const  result = await  prisma.post.create({
		data: {
		title: payload.data?.title,
		content: payload.data?.content,
		},
		});
		return  res.status(200).json({ data: result });
	} catch (error) {
		return  res.status(400).json({ error });
		}
	});
- That's it you are good to go...
06/2025
.png?alt=media&token=eb010cab-5cfb-4b2e-81d9-4a1e5704951e)
Technology and Gadgets
Setup Dyanmic Subdomain
Setup subdomain like vercel dynamically
- First we need to setup express js and typescript server
	pnpm install express
	pnpm install -D @types/express@4 ts-node @types/node typescript
	pnpm tsc init
- Initialize your tsconfig.json
pnpm tsc --init
- Add following options to tsconfig
	"typeRoots": ["./src/types", "./node_modules/@types"],
	"rootDir": "./src",
	"outDir": "./dist"
- Add the following code to your index.ts
- First we need to setup types
	// Add subdomain type to express request
	declare  global {
			namespace  Express {
			interface  Request {
			subdomainUser?: string;
			}
		}
	}
- Add middleware to detect subdomain
	// Subdomain detection middleware
	app.use((req: Request, res: Response, next: NextFunction) => {
		const  host  =  req.headers.host;
		const  subdomain  =  host?.split(".")[0];
		if (
		subdomain  &&
		subdomain  !==  "www"  &&
		subdomain  !==  "localhost:3000"  &&
		!/^\d+\.\d+\.\d+\.\d+$/.test(subdomain) // ignore IP addresses
		) {
			req.subdomainUser  =  subdomain;
		}
		next();
	});
- Then in the main route we can handle subdomain thing
	app.get("/", async (req: Request, res: Response) => {
	const  subdomain  =  req.subdomainUser;

	if (subdomain  &&  validSubdomains.includes(subdomain  as  any)) {
		const  themeData  =
		AbstractThemeOptionsSubDomain[
		subdomain  as  keyof  typeof  AbstractThemeOptionsSubDomain
		];
		const  html  =  await  engine.renderFile("abstract/index", {
		...themeData,
		subdomain,
		});
		return  res.send(html);
	}
	const  html  =  await  engine.renderFile("abstract/index", AbstractThemeOptions);
	res.send(html);

	});
- Good To Go Your Subdomain server is done
06/2025
.png?alt=media&token=e5b2c717-63c0-4550-bfb9-6398fa1214dd)
Technology and Gadgets
Setup Socket.io Typescript
This blog is about setting up typescript socket io server for realtime functionallity.
- Install socket io
npm install socket.io
- After installing we need to declare it's type to express js
- Create a file in /types/index.d.ts
- Configure Typescript
"typeRoots": ["./types", "./node_modules/types"]
- In the index.d.ts file add the following code snippet
	import { Server as SocketIoServer} from "socket.io";

	declare global {
		namespace Express {
			interface Application {
				io?: SocketIoServer
			}
		}
	}
- Then add follwing code in index.ts file
	import  http  from  "http";
	import { Server  as  SocketIOServer } from  "socket.io";
	import express from "express";

	const app:Express = express();
	const server = http.createServer(app);
	const io = new SocketIoServer {server, {
			cors: {
				origin: "http://localhost:5173",
				methods: ["GET", "POST", "PUT", "DELETE"],
				credentials: true,
			}
		}
	}
	app.io = io
- After Setting up your socket server is ready to use
	// This code must be added to your routes in order to use socket io
	const socket = req.app.io;
	socket?.emit("event_name", event_name);
- That's it you have successfully setup your socket io server and you are good to go :)
06/2025

Technology and Gadgets
Supercharge Your Website: A Deep Dive into Performance & Optimization
Navigating the digital landscape successfully hinges on a website that's not just visually appealing, but also incredibly efficient, highly optimized, and easily discoverable. In today's fast-paced online world, where user attention spans are fleeting and search engine algorithms are ever-evolving, a superior web experience is paramount. This in-depth guide explores key strategies and modern approaches to elevate your website's performance across the board.
Beyond Pretty Pixels: Elevating Website Efficiency, Optimization, and Visibility
In the competitive arena of the internet, a website is far more than just an online brochure. It's a critical tool for engagement, conversion, and brand building. To truly succeed, your digital presence must be a finely tuned machine, delivering speed, seamless user experience, and unwavering visibility. Let's delve into the core pillars that will transform your website from good to exceptional.
1. Accessibility: The Foundation of Inclusivity
A truly effective website is one that can be accessed and enjoyed by everyone, regardless of their abilities or the technology they use. Accessibility isn't just a compliance checkbox; it's a fundamental principle of good web design. By adhering to WCAG (Web Content Accessibility Guidelines), we ensure our websites are usable for individuals with visual, auditory, motor, and cognitive disabilities. This includes:
- Semantic HTML: Using appropriate HTML tags (
<h1>,<p>,<nav>, etc.) to structure content logically, enabling screen readers to interpret and convey information accurately. - Alt Text for Images: Providing descriptive
altattributes for all images, allowing visually impaired users to understand the image's content. - Keyboard Navigation: Ensuring all interactive elements can be navigated and activated using only a keyboard.
- Sufficient Color Contrast: Designing with adequate contrast between text and background colors to aid readability for users with low vision.
- Clear and Consistent Navigation: Implementing intuitive navigation menus that are easy to understand and use.
Prioritizing accessibility not only broadens your audience but also often improves SEO, as many accessibility best practices align with search engine crawlability.
2. Core Web Vitals & Lighthouse: The Performance Barometers
Google's Core Web Vitals are a set of metrics that measure real-world user experience for loading performance, interactivity, and visual stability. They are now a crucial ranking factor. Tools like Lighthouse, an open-source automated tool from Google, provide comprehensive audits for performance, accessibility, best practices, SEO, and Progressive Web App (PWA) capabilities.
Focusing on Core Web Vitals means optimizing for:
- Largest Contentful Paint (LCP): Measures when the largest content element on the screen is rendered.
- First Input Delay (FID): Measures the time from when a user first interacts with a page (e.g., clicks a button) to the time when the browser is actually able to respond to that interaction. (Note: FID is being replaced by INP - Interaction to Next Paint - in March 2024, which measures the latency of all user interactions).
- Cumulative Layout Shift (CLS): Measures the visual stability of a page, quantifying unexpected layout shifts.
Regularly running Lighthouse audits and addressing the identified issues is vital for improving user experience and search engine rankings.
3. Images Optimization: The Visual Speed Boost
Images are often the heaviest assets on a webpage and can significantly impact loading times. Image optimization is crucial for efficiency. This involves:
- Compression: Using tools to reduce file size without a noticeable loss in quality (e.g., WebP format).
- Lazy Loading: Deferring the loading of images until they are about to enter the viewport, reducing initial page load time.
- Responsive Images: Serving different image sizes based on the user's device and screen resolution, preventing unnecessary downloads of large images on smaller screens.
- CDN (Content Delivery Network): Distributing images across multiple servers globally, allowing users to download them from the closest server, reducing latency.
4. CI/CD: Streamlined Development and Deployment
Continuous Integration (CI) and Continuous Delivery/Deployment (CD) are practices that automate the building, testing, and deployment of code changes. Implementing a robust CI/CD pipeline offers numerous benefits:
- Faster Release Cycles: Automating repetitive tasks allows for quicker and more frequent deployments of new features and bug fixes.
- Reduced Errors: Automated testing catches issues early in the development process, minimizing the risk of bugs reaching production.
- Improved Collaboration: Developers can integrate their code changes frequently, leading to fewer conflicts and a more cohesive codebase.
- Consistent Deployments: Ensures that every deployment follows the same standardized process, reducing human error.
5. Basic Security: Protecting Your Digital Assets
Website security is non-negotiable. A compromised website can lead to data breaches, reputational damage, and loss of user trust. Basic security measures include:
- HTTPS: Using SSL/TLS certificates to encrypt communication between the browser and the server, protecting sensitive user data.
- Strong Passwords and Two-Factor Authentication (2FA): Enforcing robust password policies for all administrative accounts and enabling 2FA.
- Regular Software Updates: Keeping all website software, plugins, and frameworks up to date to patch known vulnerabilities.
- Input Validation and Sanitization: Preventing common attacks like SQL injection and cross-site scripting (XSS) by validating and sanitizing all user input.
- Web Application Firewall (WAF): Providing a layer of protection against various web-based attacks.
6. SEO Optimization: Getting Found Online
Search Engine Optimization (SEO) is the art and science of improving your website's visibility in search engine results pages (SERPs). Beyond technical optimizations, key SEO strategies include:
- Keyword Research: Identifying relevant keywords and phrases that your target audience uses to find information.
- On-Page SEO: Optimizing page titles, meta descriptions, header tags, and content for target keywords.
- High-Quality Content: Creating valuable, informative, and engaging content that addresses user queries and establishes authority.
- Link Building: Acquiring high-quality backlinks from reputable websites to improve domain authority.
- Mobile-Friendliness: Ensuring your website is responsive and provides an excellent experience on all devices, as Google prioritizes mobile-first indexing.
- Schema Markup: Using structured data to help search engines understand the content on your pages, potentially leading to rich snippets in search results.
7. Further Optimization: The Pursuit of Speed
Beyond the fundamental optimizations, advanced techniques can shave off critical milliseconds from your loading times:
- Webpack, Vite, esBuild: These are powerful module bundlers and build tools that significantly optimize the compilation and bundling of JavaScript, CSS, and other assets. They enable:
- Tree Shaking: Eliminating unused code from bundles.
- Code Splitting: Breaking down large bundles into smaller, on-demand chunks.
- Minification and Uglification: Removing unnecessary characters and obfuscating code for smaller file sizes.
- Bundle Optimization: Focusing on reducing the overall size and complexity of your JavaScript and CSS bundles. This involves analyzing bundle contents and identifying opportunities for reduction.
- Bundle Profiling: Using tools to visualize and understand the contents of your JavaScript bundles, identifying large dependencies or duplicated code.
- Bundle Caching: Implementing effective caching strategies for your bundled assets, allowing browsers to store and reuse them, reducing subsequent load times.
8. Building Websites with Custom Code: Precision and Performance
While content management systems (CMS) offer convenience, building websites with custom code provides unparalleled control over performance and optimization. This approach allows developers to:
- Eliminate Bloat: Include only the necessary code and assets, avoiding the extraneous files often loaded by off-the-shelf solutions.
- Tailor Performance: Implement highly specific optimizations for your unique website structure and content.
- Leverage Modern Frameworks: Utilize cutting-edge frameworks that are built for speed and efficiency.
9. Reasons for the Shift: Why Custom Code Reigns Supreme for Performance
The move towards custom code, particularly for static sites, is driven by compelling advantages:
- Reduced Website Size: Faster Loading Times: This is perhaps the most significant benefit. By stripping away unnecessary features and code, custom-built sites are significantly lighter, leading to near-instantaneous loading times. This directly translates to improved user experience and lower bounce rates.
- Enhanced SEO and Accessibility Control: With custom code, you have granular control over every aspect of your site's structure, semantics, and performance, which are all critical for SEO and accessibility. You can implement best practices precisely without fighting against a CMS's inherent limitations.
- Static Page Optimization: Static websites, served as pre-built HTML files, are inherently faster and more secure than dynamic sites that rely on database queries and server-side processing for every request. They can be hosted on CDNs, further enhancing global delivery speed.
Current Situation: Choosing the Right Tools for the Job
The landscape of web development is constantly evolving, with new tools emerging to address the demand for highly performant websites.
- For Static Sites, we can use:
- Astro JS: An excellent choice for content-focused websites where minimal JavaScript is desired. Astro sends only the necessary JavaScript to the client, resulting in incredibly fast load times.
- Next.js: A powerful React framework suitable for static sites, but also for those with blogs and minor backend interactions. Next.js offers features like server-side rendering (SSR) and static site generation (SSG), allowing for pre-rendered pages that load quickly.
While building static websites, they are significantly faster than dynamic sites. This is because the server doesn't have to process requests and query databases for every page view.
Using WordPress causes loading of unnecessary CSS and JS files, most of which are not even used. While WordPress is undeniably popular and user-friendly, its vast ecosystem often leads to performance overhead. Themes and plugins frequently load excessive CSS and JavaScript, much of which goes unused on a given page, negatively impacting Core Web Vitals. This is where the lean approach of custom code or optimized frameworks shines.
10. Further Improvements: Extending Functionality with Modern CMS
For clients who require the ability to publish blogs or add content themselves, while maintaining the benefits of a performant front-end, a headless CMS is the ideal solution.
- We can use CMSs like Sanity or Strapi for clients who want to publish blogs or add content themselves. These "headless" CMSs provide a content API that can be consumed by any front-end framework (like Astro or Next.js). This allows for a decoupled architecture where content management is handled separately from the website's presentation layer, offering the best of both worlds: ease of content editing for clients and blazing-fast performance for users.
These improvements represent a commitment to cutting-edge web development practices. By focusing on accessibility, performance, security, and advanced optimization techniques, we can deliver websites that not only meet but exceed modern expectations. This aligns with standard development practices used by many leading companies, ensuring a future-proof and high-performing online presence. Additionally, for businesses in the e-commerce space, we can offer Custom Shopify theme designs which are meticulously crafted for efficiency, speed, and a superior shopping experience, moving beyond generic templates to deliver truly optimized online stores.
05/2025

Technology and Gadgets
Resume Template
Vinay Partap Singh
Full Stack Web & Mobile Developer
Portfolio | developervsandhu@email.com | +1 (647)-924-6141| LinkedIn | GitHub
🔑 Summary
Creative and detail-oriented Full Stack Developer specializing in modern web technologies and cross-platform mobile development. Proficient in JavaScript, React, Next.js, React Native, Node.js, MongoDB, and Cloud services. Passionate about building scalable products, with a focus on clean architecture, responsive design, and user-first experiences.
📅 Experience
Full Stack Developer | Freelance
Remote | Jan 2023 - Present
- Designed and developed web applications using React.js, Next.js, TailwindCSS, and Node.js.
- Built cross-platform mobile apps using React Native with backend integration.
- Deployed applications using Vercel, Netlify, and Firebase Hosting.
- Implemented REST APIs, user authentication, and cloud storage solutions.
- Optimized websites for SEO, accessibility, and performance.
💼 Projects
VM Chat Application
- Built a real-time chat app using React Native and Firebase.
- Implemented real-time messaging, user authentication, and media uploads.
- Deployed to Google Play Store (Beta Version).
Sync Share
- Developed a cloud-based file-sharing app using Next.js and MongoDB.
- Enabled secure uploads, encrypted sharing links, and real-time notifications.
Spotify Clone
- Created a music streaming app UI with React, TailwindCSS, and Spotify API integration.
- Focused on responsive design and seamless navigation.
More projects showcased at vinaypartap.netlify.app
🔧 Skills
- Frontend: React.js, Next.js, HTML5, CSS3, TailwindCSS, Redux
- Backend: Node.js, Express.js, REST APIs, Firebase, MongoDB
- Mobile: React Native
- DevOps & Tools: Git, Vercel, Netlify, Cloudinary, Supabase
- Other: UI/UX Principles, SEO Optimization, Responsive Web Design
📈 Education
Diploma
Computer Programming
Georgian College | 2024 - Present
🌐 Certifications
- Web Development 2023 Bootcamp — Udemy
- Shopify Theme Development — Udemy
- Mern Stack Development — Udemy
- Wordpress Theme Development — Udemy
- WooCommerce Theme Development — Udemy
- Next JS & WordPress as a Headless CMS — Udemy
- React Native — Udemy
📢 Languages
- English (Professional)
- Hindi (Native)
💬 Interests
- UI/UX Design | Mobile App Development | Cloud Technologies | Open Source Contribution | Robotics | AI
04/2025

Technology and Gadgets
From Express to NestJS: My Early Experience
As a developer who has spent most of their time working with Express, jumping into NestJS felt like stepping into a completely different environment. At first, I honestly thought, "This is harder than I expected." But now, after spending some time learning and experimenting, I can say — it's actually pretty great.
Here’s how it’s been going so far.
👋 The Initial Confusion
Coming from Express, I was used to writing quick APIs using minimal setup. With NestJS, the first time I saw:
@Controller()
export class AppController {
  constructor(private readonly appService: AppService) {}
}}
My reaction was: “Why do I need all this to return a simple response?”
NestJS uses decorators, modules, and a layer of abstraction that can be confusing when you're used to writing routes directly in Express. But once you understand the structure, it starts making sense.
🔍 What’s Different?
1. Project Structure
NestJS is highly opinionated — which means it wants you to structure things in a certain way. Instead of having everything in a single file or folder, you have:
controllersservicesmodules
At first, it felt like too much boilerplate. But now I see the benefits — especially as your app grows. It’s organized, readable, and easy to scale.
2. Dependency Injection
NestJS uses a concept called dependency injection — which, in simple terms, lets you inject reusable logic (like a service) into a controller or another service.
In Express, I usually had to import everything manually and manage instances myself. With NestJS, this is handled automatically — and it feels really clean once you get used to it.
3. Decorators Everywhere
Decorators like @Controller(), @Get(), @Post(), @Injectable() add metadata to your code so NestJS knows what to do with it.
They can be a bit intimidating at first, but they actually make your code easier to read once you're familiar.
<Highlight code={@Get('profile') getProfile() { return { message: 'User profile data' }; }} language="ts" />
Compared to app.get('/profile', handler) in Express, it feels more structured and modular.
🎯 What I Like About NestJS So Far
- The separation of concerns makes the code easier to maintain.
- It encourages good practices from the beginning.
- It’s great for building scalable APIs.
- You don’t have to set up everything from scratch — a lot is already built-in (validation, guards, interceptors, etc.).
💥 What’s Been Challenging
- Getting used to modules and how everything fits together.
- Understanding when and how to use decorators properly.
- Adapting my Express mindset to a more structured NestJS one.
But honestly, these are the kinds of challenges that lead to better understanding and growth.
🤔 Final Thoughts
If you’re comfortable with Express but looking for a more structured framework that helps you build larger applications in a cleaner way, NestJS is a solid choice. Yes, the learning curve is real. But once you get used to it, you’ll start to appreciate how much it helps in the long run.
I’m still learning — and that’s okay. Every day I build something small, break something, fix it, and learn something new.
And that’s the fun part. 😄
Let me know if you’re learning NestJS too — I’d love to hear your experience!
04/2025

Technology and Gadgets
My Journey into Data Structures and Algorithms (DSA)
Learning Data Structures and Algorithms (DSA) has been an exciting and enriching experience so far. As I dive deeper into core concepts like sorting algorithms, recursion, and linked lists, I can already see improvements in my logical thinking and problem-solving abilities.
Sorting Algorithms
Sorting is one of the fundamental concepts in DSA, and understanding different sorting techniques has helped me grasp how data can be organized efficiently. Some of the algorithms I have explored include:
- Bubble Sort – A simple yet inefficient algorithm that repeatedly swaps adjacent elements until the list is sorted.
- Selection Sort – An approach that selects the smallest element from an unsorted section and swaps it with the first element.
- Insertion Sort – Efficient for smaller datasets, this algorithm builds a sorted array by inserting elements in the correct position.
- Merge Sort & Quick Sort – More advanced techniques that use divide-and-conquer strategies for faster sorting.
Through these, I have realized the importance of time complexity and how different algorithms perform under varying conditions.
Recursion
Recursion is another topic that has fascinated me. Initially, it seemed a bit tricky to grasp, but once I understood the concept of breaking problems into smaller subproblems and using base cases, it became clearer. I practiced recursion through:
- Factorial Calculation
- Fibonacci Series
- Tower of Hanoi
- Binary Search (Recursive Approach)
Understanding recursion has also helped me in tackling problems that involve backtracking and tree-based structures.
Linked Lists (Singly & Doubly)
Learning about linked lists has been an eye-opener. Unlike arrays, which require contiguous memory allocation, linked lists provide dynamic memory usage. So far, I have worked with:
- Singly Linked List – Where each node points to the next node.
- Doubly Linked List – Where each node maintains links to both the previous and next nodes.
Implementing basic operations like insertion, deletion, and traversal has given me confidence in understanding pointer manipulation and memory management.
Conclusion
My journey into DSA has been insightful, and I can already feel an improvement in my logical thinking and problem-solving approach. Every new concept I learn pushes me to think critically, and I am excited to explore more advanced topics like trees, graphs, and dynamic programming in the future.
DSA is a skill that requires consistent practice, and I am looking forward to solving more problems and refining my understanding further!
02/2025

Technology and Gadgets
Making Waves Online: Announcing the Launch of the ThoughtWave Website!🌊
We’re thrilled to unveil the official website for ThoughtWave — a digital haven for thinkers, creators, and idea enthusiasts! The journey of turning ThoughtWave from a concept into a fully realized platform has been incredible, and we’re excited to finally share it with the world.
Welcome to ThoughtWave Online
The newly launched website, ThoughtWave, is your gateway to discovering, sharing, and engaging with a world of ideas. Whether you’re a thinker looking to share your insights, a seeker searching for inspiration, or someone eager to connect with a global community, ThoughtWave has something for everyone.
Why ThoughtWave?
In an age dominated by fleeting trends and surface-level exchanges, ThoughtWave stands out as a space designed for depth, creativity, and connection. Here’s why ThoughtWave is your next go-to platform:
- Community-Centered: ThoughtWave brings together people who value meaningful conversations.
- Personalized Experience: Tailor your feed and discover ideas that resonate with your interests.
- Authentic Sharing: A platform built not for virality, but for authenticity and thoughtfulness.
Key Features of the Website
The new ThoughtWave website is sleek, intuitive, and packed with features to make your experience seamless:
- Dynamic Homepage: The homepage gives you an instant glimpse into the most engaging thoughts and trending discussions.
- User Profiles: Showcase your personality by creating a profile that reflects your thoughts and passions.
- Thought Sharing: Post your insights, reflections, or questions to spark meaningful conversations.
- Explore Section: Discover trending ideas, connect with new users, and find inspiration from the ThoughtWave community.
- Seamless Navigation: The website is designed to make browsing, posting, and connecting effortless.
How to Get Started
- Visit the Website: Go to ThoughtWave.
- Sign Up: Create your profile to start sharing and engaging.
- Explore: Browse trending thoughts, follow users, and join the conversations.
- Share: Post your ideas and become part of the wave.
Join the Movement
ThoughtWave is more than just a website — it’s a movement to bring people together through ideas and conversations. With this launch, we’re inviting you to be part of a platform that prioritizes authenticity, creativity, and community.
Let’s make waves together, one thought at a time. Dive into the conversation today and help shape the future of meaningful connections online.
Visit Us Now!
Check out the website at ThoughtWave and become part of a growing community where your ideas matter.
ThoughtWave — Where Ideas Flow, and Minds Meet. 🌟
01/2025

Personal Development
The Only Competition I Have Is the Person I Was Yesterday
In a world obsessed with rankings, comparisons, and constant validation from others, it's easy to get lost in the race to "be the best." Social media, professional accolades, and even personal milestones often become benchmarks for how we measure ourselves against others. But what if the true competition lies not with the people around us, but within ourselves?
The idea that "the only competition I have is the person I was yesterday" isn't just a comforting mantra; it’s a transformative mindset. It’s a philosophy that shifts focus inward, urging us to measure our growth by our own standards rather than external benchmarks.
Breaking Free from External Comparisons
The problem with comparing ourselves to others is that it’s inherently flawed. Everyone is on their unique journey, shaped by different circumstances, goals, and timelines. By constantly measuring ourselves against others, we ignore the nuances that make our paths distinct.
Think about this: Someone else’s success doesn’t diminish your potential. Their achievements might be inspiring, but they don’t define your worth. When you let go of these external comparisons, you free yourself from the pressure to compete with anyone else.
The Power of Self-Competition
Competing with the person you were yesterday is a more productive and fulfilling approach to self-improvement. Here’s why:
-
It Fosters Growth Over Perfection
Instead of chasing an unattainable ideal, self-competition encourages you to aim for incremental improvements. Did you learn something new today? Did you handle a challenge better than you would have last week? These small wins are powerful markers of progress. -
It Promotes Authenticity
Competing with yourself helps you stay true to your values and goals. When your focus is internal, you’re less likely to follow trends or societal expectations that don’t resonate with who you are. -
It Builds Resilience
Measuring yourself against your past self allows you to see how far you’ve come. This perspective can be a source of motivation and resilience, especially during tough times.
Practical Steps to Compete with Yourself
-
Set Personal Goals
Identify areas where you’d like to grow—be it in your career, relationships, health, or hobbies. Ensure these goals align with your values and passions, not what others expect of you. -
Track Your Progress
Keep a journal or use digital tools to track your progress over time. Celebrate milestones, no matter how small they seem. -
Reflect Regularly
Take time to reflect on your growth. Ask yourself: What did I do better today? Where can I improve tomorrow? This self-awareness is key to continuous development. -
Practice Self-Compassion
Growth isn’t linear. There will be days when you feel stuck or regress. Instead of being harsh on yourself, use these moments as learning opportunities. Remember, the goal is progress, not perfection.
The Ripple Effect of Self-Improvement
When you focus on competing with yourself, you inspire those around you. People notice when someone is genuinely committed to growth and authenticity. Your journey can motivate others to reflect on their own paths, creating a ripple effect of positivity and self-awareness.
Final Thoughts
"The only competition I have is the person I was yesterday" isn’t just a phrase; it’s a lifestyle. It’s about embracing growth, celebrating small victories, and staying true to your own journey.
When you stop competing with others and start competing with yourself, you’ll find that success isn’t about being better than someone else—it’s about being better than you were. And that’s the kind of success that truly matters.
So, the next time you’re tempted to compare yourself to someone else, pause and ask: Am I a little better than I was yesterday? If the answer is yes, then you’re already winning.
12/2024

Technology and Gadgets
Complete Guide for building basic E-Commerce Backend API
Here's a comprehensive API roadmap for building your e-commerce platform, starting from initial setup to deployment and scaling. The roadmap is divided into phases, focusing on incremental progress.
Phase 1: Setup and Planning
-
Define Requirements
- List essential features (e.g., user management, product handling, order processing).
- Identify roles (Admin, Customer).
-
Set Up the Development Environment
- Install Node.js and npm.
- Set up a new Express.js project:
npm init→ Install dependencies (express,dotenv, etc.). - Configure Prisma for database interactions:
npx prisma init.
-
Database Design
- Define tables (Users, Products, Categories, Orders, etc.).
- Create your Prisma schema based on requirements.
-
Basic Project Structure
-
Set up a directory structure:
├── controllers/
├── routes/
├── middlewares/
├── models/
├── utils/
├── prisma/
├── app.js
└── server.js ```
-
Phase 2: Core API Development
1. User Management
- Features:
- User registration (POST
/api/users/register) - User login (POST
/api/users/login) - JWT-based authentication (middleware for protected routes)
- User registration (POST
- Tasks:
- Create
Usertable in Prisma schema. - Implement bcrypt for password hashing.
- Implement JWT for authentication.
- Write routes and controllers.
- Create
2. Product Management
- Features:
- Add products (POST
/api/products– Admin only) - Get all products (GET
/api/products) - Get product details (GET
/api/products/:id) - Edit products (PUT
/api/products/:id– Admin only) - Delete products (DELETE
/api/products/:id– Admin only)
- Add products (POST
- Tasks:
- Create
ProductandCategorytables in Prisma schema. - Seed the database with initial categories and products.
- Write routes and controllers.
- Create
Phase 3: Shopping Experience
1. Shopping Cart
- Features:
- Add to cart (POST
/api/cart) - Get cart items (GET
/api/cart) - Update cart item quantity (PUT
/api/cart/:itemId) - Remove cart item (DELETE
/api/cart/:itemId)
- Add to cart (POST
- Tasks:
- Create
Carttable in Prisma schema. - Write cart management routes and controllers.
- Create
2. Wishlist (Optional)
- Features:
- Add to wishlist (POST
/api/wishlist) - Get wishlist items (GET
/api/wishlist)
- Add to wishlist (POST
- Tasks:
- Create
Wishlisttable in Prisma schema. - Write wishlist management routes and controllers.
- Create
Phase 4: Order Management
1. Checkout
- Features:
- Place an order (POST
/api/orders) - View order history (GET
/api/orders)
- Place an order (POST
- Tasks:
- Create
OrderandOrderItemstables in Prisma schema. - Integrate cart validation and calculate totals during checkout.
- Create
2. Payment Integration
- Features:
- Payment processing (e.g., with Stripe or PayPal).
- Update order status upon successful payment.
- Tasks:
- Integrate the payment gateway.
- Create webhook handlers for payment events.
Phase 5: Admin Features
1. Admin Dashboard
- Features:
- View user list (GET
/api/admin/users) - View and manage products (GET/POST/PUT/DELETE
/api/admin/products) - View all orders (GET
/api/admin/orders)
- View user list (GET
- Tasks:
- Use middleware to secure admin-only routes.
Phase 6: Additional Features
- Reviews and Ratings
- Allow users to leave reviews for products.
- Average rating calculation for each product.
- Notifications
- Send email notifications for order confirmation.
- Notify users of order status changes.
- Activity Logs
- Track user actions like login, purchase, etc.
Phase 7: Testing
- Unit Testing
- Use tools like Jest to test controllers and services.
- Integration Testing
- Test routes and middleware using tools like Supertest.
- API Documentation
- Use Swagger to document API endpoints.
Phase 8: Deployment
- Set Up Hosting
- Use platforms like AWS, DigitalOcean, or Vercel.
- Environment Configuration
- Use
.envfor secrets (e.g., database credentials, JWT secret).
- Use
- Database Hosting
- Host your PostgreSQL database on services like RDS or Supabase.
- CI/CD Pipeline
- Automate deployment with GitHub Actions or similar tools.
Phase 9: Scaling and Optimization
- Caching
- Use Redis to cache frequently accessed data like products.
- Monitoring
- Set up tools like PM2, New Relic, or Sentry for performance and error monitoring.
- Load Balancing
- Use Nginx or AWS Elastic Load Balancer to handle high traffic.
This roadmap will guide you from the initial setup to a scalable, production-ready e-commerce API.
12/2024

Personal Development
The Power of Positive Thinking: How to Cultivate Optimism and Its Impact on Your Life
We’ve all heard phrases like “Think positive” or “Look on the bright side.” While they might sound cliché, there’s real power behind these words. Positive thinking isn’t just about ignoring life’s difficulties or pretending everything is perfect. It’s about approaching challenges with a mindset that helps you navigate them with resilience and hope. Let’s dive into what positive thinking truly means, how you can cultivate it, and the profound impact it can have on your life.
What Is Positive Thinking?
Positive thinking isn’t about being naïvely cheerful all the time. Instead, it’s a mental attitude where you focus on the good in any given situation. It doesn’t mean ignoring the bad—life is full of ups and downs—but rather choosing to focus on what you can learn, what you can control, and what’s going well.
For example, let’s say you didn’t get the job you wanted. A negative thought pattern might dwell on feelings of failure or self-doubt. A positive thinker, however, might reflect on the experience, see it as a stepping stone, and focus on what they learned to improve for the next opportunity.
Why Does Positive Thinking Matter?
Optimism isn’t just about feeling good in the moment. Research has shown that positive thinking can lead to a range of benefits, including:
-
Better Physical Health: Studies suggest that optimists tend to have stronger immune systems, lower stress levels, and even longer lifespans.
-
Improved Mental Health: Positive thinkers are less likely to experience depression and anxiety because they focus on solutions rather than problems.
-
Stronger Relationships: People who exude positivity are often more enjoyable to be around, leading to better connections with friends, family, and coworkers.
-
Greater Resilience: When faced with setbacks, positive thinkers are better equipped to bounce back and find ways forward.
How to Cultivate Positive Thinking
If you’re not naturally a glass-half-full kind of person, don’t worry. Optimism is a skill you can develop with practice. Here are some practical steps to get started:
1. Practice Gratitude
Take a moment every day to reflect on what you’re thankful for. It could be as simple as enjoying a good cup of coffee, a kind word from a friend, or even a sunny day. Gratitude shifts your focus from what’s lacking to what’s abundant in your life.
2. Reframe Negative Thoughts
When something goes wrong, ask yourself: “What can I learn from this?” or “Is there a silver lining?” This practice trains your brain to see challenges as opportunities rather than obstacles.
3. Surround Yourself with Positivity
The people you spend time with influence your mindset. Seek out friends, family, or mentors who encourage and inspire you. Limit time with those who drain your energy or foster negativity.
4. Focus on What You Can Control
Worrying about things beyond your control only breeds stress. Instead, channel your energy into actions you can take to improve your situation or adapt to it.
5. Use Affirmations
Positive affirmations are statements that reinforce an optimistic mindset. For example, tell yourself, “I am capable,” or “I’ve overcome challenges before, and I can do it again.” Repeating these can shift your mindset over time.
6. Take Care of Your Body
Your physical health has a direct impact on your mental outlook. Regular exercise, a balanced diet, and adequate sleep can do wonders for maintaining a positive mindset.
The Ripple Effect of Optimism
When you cultivate positive thinking, the benefits often extend beyond your own life. Your optimism can inspire and uplift those around you, creating a ripple effect. Imagine walking into a room with a smile and a warm attitude—it’s contagious. People are drawn to positivity, and this can open doors in both your personal and professional life.
For instance, in a work environment, approaching problems with a can-do attitude can encourage collaboration and innovation. In personal relationships, focusing on the positives can strengthen bonds and resolve conflicts more effectively.
Embracing the Journey
It’s important to remember that positive thinking doesn’t mean you’ll never feel sad, angry, or frustrated. These emotions are a natural part of life, and it’s healthy to acknowledge and process them. The goal isn’t perfection—it’s progress. Each step you take toward cultivating optimism is a step toward a happier, healthier, and more fulfilling life.
Start small. Begin with a single habit, like writing down three things you’re grateful for each day. Over time, these small practices can lead to big changes. And remember: the power of positive thinking isn’t about ignoring life’s challenges—it’s about facing them with courage, resilience, and hope.
It's a Journey, Not a Destination
Cultivating a positive mindset is an ongoing process. It won't happen overnight, and there will be setbacks along the way. But with consistent effort and practice, you can gradually shift your perspective and experience the many benefits of positive thinking.
So, start today! Make a conscious effort to notice the good, challenge negative thoughts, and practice gratitude. You might be surprised at the positive impact it can have on your life.
Disclaimer: This blog post is for informational purposes only and does not constitute professional advice.
12/2024

Technology and Gadgets
Mastering Docker Image Optimization: A Step-by-Step Guide
When working with Docker, image optimization is crucial for faster builds, efficient storage usage, and quicker deployments. This blog dives deep into strategies and best practices for reducing Docker image sizes and improving their performance.
Why Optimize Docker Images?
- Smaller Images: Reduces storage costs and speeds up pull and push operations.
- Faster Deployments: Smaller images take less time to transfer, accelerating CI/CD pipelines.
- Security: Minimal images reduce the attack surface by including only necessary dependencies.
1. Use Lightweight Base Images
Choosing a lightweight base image is the first step toward optimization. Instead of using a general-purpose image like ubuntu, opt for smaller alternatives such as:
- Alpine Linux: A minimal image (~5 MB) with essential tools.
- Distroless Images: Focused on security and minimal runtime dependencies.
Example:
# Instead of this: FROM ubuntu:20.04
# Use this: FROM alpine:latest
2. Optimize Dockerfile Instructions
a. Minimize Layers
Each RUN, COPY, and ADD command creates a new layer. Combine commands to reduce the number of layers.
Before:
RUN apt-get update
RUN apt-get install -y curl
RUN apt-get clean
After:
RUN apt-get update && apt-get install -y curl && apt-get clean
b. Sort and Group Commands
Group related commands and sort package installations alphabetically for consistency and caching benefits.
Example:
RUN apt-get update && apt-get install -y \
    curl \
    git \
    unzip && \
    apt-get clean
3. Leverage Multi-Stage Builds
Multi-stage builds allow you to separate build dependencies from runtime dependencies, keeping the final image small.
Example:
# Stage 1: Build
FROM node:16 AS builder
WORKDIR /app
COPY package*.json ./
RUN npm install
COPY . .
RUN npm run build
Stage 2: Runtime
FROM node:16-alpine
WORKDIR /app
COPY --from=builder /app/dist ./dist
CMD ["node", "dist/index.js"]`
This approach ensures the final image contains only the compiled application, excluding build tools and intermediate files.
4. Remove Unnecessary Files
Exclude unnecessary files and directories like .git, node_modules, and documentation files using a .dockerignore file.
.dockerignore Example:
node_modules
.git
*.log
Dockerfile
5. Avoid Installing Unnecessary Packages
Install only essential dependencies. For Node.js, use npm ci for a clean and efficient dependency installation process.
Example:
RUN npm ci --only=production
The --only=production flag ensures only production dependencies are installed, excluding development tools.
6. Use Caching Effectively
Docker caches layers to speed up subsequent builds. To maximize caching benefits:
- Place frequently changing instructions (e.g.,
COPY . .) later in theDockerfile. - Place rarely changing instructions (e.g.,
RUN apt-get update) earlier.
Example:
# Cache dependencies
COPY package*.json ./
RUN npm install
# Add application code
COPY . .`
7. Clean Up Temporary Files
Remove temporary files and unnecessary caches during the build process to keep images clean.
Example:
RUN apt-get update && apt-get install -y curl && \
    rm -rf /var/lib/apt/lists/*
8. Analyze Image Size
Use tools like docker image ls to inspect image sizes and identify bloated images:
docker image ls
For a deeper dive into layer sizes, use:
docker history <image_name>
9. Tag and Version Your Images
Tagging and versioning help manage multiple image versions and avoid redundant builds.
Example:
docker build -t myapp:1.0 .
docker build -t myapp:latest
10. Use Docker Slim
Docker Slim is a tool that automatically optimizes your images by removing unnecessary files and dependencies.
Installation:
curl -sLf https://raw.githubusercontent.com/docker-slim/docker-slim/master/scripts/install-docker-slim.sh | sudo bash
Usage:
docker-slim build <image_name>
11. Test and Validate Optimized Images
After optimization, always test your image to ensure it works as expected:
docker run -it myapp:latest
Conclusion
Optimizing Docker images is not just about reducing size but also about improving efficiency, security, and deployment speed. By following these best practices, you can create lean and reliable Docker images for your applications. Bookmark this guide for future reference as you continue your Docker journey.
What are your favorite tips for optimizing Docker images? Share them in the comments below!
12/2024

Technology and Gadgets
Mastering Docker: From Zero to Advanced in One Guide
Welcome to the ultimate crash course on Docker. This blog will cover everything you need to know about Docker, starting from the basics to advanced topics, ensuring you have a strong foundation and practical knowledge.
Part 1: Getting Started
Problem Statement
Modern application development demands scalability, portability, and consistency across environments. Docker provides a robust solution by allowing you to containerize applications and their dependencies, ensuring smooth development and deployment workflows.
Installation of Docker CLI and Desktop
Windows/macOS
- Download Docker Desktop from Docker's official website.
- Follow the installation wizard.
- Ensure WSL2 is enabled for Windows users.
Linux
sudo apt-get update
sudo apt-get install docker-ce docker-ce-cli containerd.io
sudo systemctl start docker
sudo systemctl enable docker
Verify installation:
docker --version
Understanding Images vs. Containers
- Images: Immutable templates for creating containers. Think of them as blueprints for the environment and application dependencies.
- Containers: Runtime instances of images. Containers are lightweight and isolated but share the host OS kernel, making them efficient and fast.
Running an Ubuntu Image in a Container
Pull the Ubuntu image:
docker pull ubuntu
Run the container interactively:
docker run -it ubuntu
This command launches a terminal session inside the Ubuntu container, where you can run commands as if you were on a separate machine.
Multiple Containers
You can run multiple containers simultaneously, each isolated from the others. For example:
docker run -d --name container1 nginx
docker run -d --name container2 redis
Each container runs in its own environment.
Port Mappings
Expose a container's internal ports to the host system using the -p flag:
docker run -d -p 8080:80 nginx
This maps port 80 of the container to port 8080 on the host machine, allowing external access.
Environment Variables
Pass environment variables to customize container behavior:
docker run -d -e MY_VAR=value alpine
These variables can be accessed within the container.
Part 2: Dockerization of a Node.js Application
Creating a Dockerfile
A Dockerfile is a script that defines how an image is built. Example:
# Base image
FROM node:14

# Set working directory
WORKDIR /app

# Copy package.json and install dependencies
COPY package*.json ./
RUN npm install

# Copy the application code
COPY . ./

# Expose the application port
EXPOSE 3000

# Start the application
CMD ["node", "index.js"]
Caching Layers
Optimize builds by structuring your Dockerfile to maximize layer caching. For instance:
- Instructions like
COPYandRUNthat change less frequently should appear earlier. - Copying
package.jsonbefore the rest of the code ensures dependencies are cached unlesspackage.jsonchanges.
Publishing to Docker Hub
-
Log in to Docker Hub:
docker login -
Tag the image:
docker tag my-app username/my-app -
Push the image:
docker push username/my-app
This makes your image accessible from any machine with Docker installed.
Docker Compose
Docker Compose simplifies managing multi-container applications. Example:
docker-compose.yml
version: '3.8'
services:
  app:
    build: .
    ports:
      - "3000:3000"
    environment:
      - NODE_ENV=production
  db:
    image: postgres
    environment:
      - POSTGRES_USER=admin
      - POSTGRES_PASSWORD=secret
Run all services:
docker-compose up
Part 3: Advanced Topics
Docker Networking
Networking options in Docker provide flexibility in container communication:
-
Bridge: Default network where containers can communicate using IPs.
docker network create my-bridge docker run --network my-bridge my-app -
Host: Shares the host network stack, removing isolation.
Volume Mounting
Persist container data by mounting host directories as volumes:
docker run -v /host/path:/container/path my-app
This ensures that data remains intact even if the container is removed.
Efficient Caching in Layers
To optimize Docker builds, order Dockerfile instructions such that frequently changing commands appear later.
Multi-Stage Builds
Multi-stage builds help reduce image size by separating build and runtime environments:
# Stage 1: Build
FROM node:14 AS builder
WORKDIR /app
COPY package*.json ./
RUN npm install
COPY . ./
RUN npm run build

# Stage 2: Runtime
FROM node:14
WORKDIR /app
COPY --from=builder /app/dist ./
EXPOSE 3000
CMD ["node", "index.js"]
This approach ensures the final image contains only the essential runtime files.
Conclusion
This comprehensive guide equips you with the knowledge to leverage Docker for efficient development and deployment. Use the commands and techniques covered here as a reference to build, optimize, and manage containerized applications seamlessly. Bookmark this guide for future reference as you advance in your Docker journey!
12/2024

Technology and Gadgets
Making Waves: Introducing ThoughtWave, the Platform for Ideas and Connection
Welcome to ThoughtWave 🌊
Welcome to ThoughtWave, the ultimate platform for sharing, connecting, and discovering thoughts and ideas! Whether you're here to share your own insights, connect with like-minded thinkers, or simply browse through the ideas of others, ThoughtWave is the place where ideas flow and minds meet.
Why ThoughtWave?
In today’s fast-paced digital world, finding a dedicated space for genuine conversations and thought-sharing can be challenging. Social media often emphasizes likes over insights, and meaningful exchanges can get lost in the noise. That’s why we created ThoughtWave — a community-driven platform built to spotlight authentic ideas and foster real discussions.
Key Features
Here’s what makes ThoughtWave unique:
- Thought Sharing: Post your thoughts, stories, or reflections and share them with an engaged community that values meaningful content.
- User Profiles: Personalize your profile with a bio, profile picture, and social media links, so others can get to know you better.
- Activity Feed: Stay connected with your interactions. Our activity feed shows all the posts you've liked, commented on, and shared, helping you keep track of your engagement.
- Explore Page: Discover popular, trending, and new thoughts shared by users around the world. ThoughtWave brings a world of ideas right to your fingertips.
- Customizable Feed: Tailor your experience by following the topics and users that interest you, ensuring your feed is always filled with relevant, engaging content.
How to Get Started on ThoughtWave
Ready to dive in? Here’s how you can start making waves on ThoughtWave:
- Create an Account: Sign up and set up your profile. Adding a profile picture and bio helps others know a little more about you.
- Share Your Thoughts: Use the "Share" button to post your thoughts. Whether it's a quick insight, a story, or a question, let the community see what’s on your mind.
- Engage with Others: Like, comment, and follow other users to join conversations and build your network.
- Explore and Discover: Head to the Explore page to find trending ideas, connect with interesting users, and expand your horizons.
Join the ThoughtWave Community
ThoughtWave is more than just a platform — it’s a community where ideas, opinions, and insights flow freely. By joining us, you’re becoming part of a space that values thoughtfulness, creativity, and connection.
Let’s make waves together. 🌊
Happy Thinking, and Welcome to ThoughtWave!
Follow us on our social channels to stay updated with the latest from the ThoughtWave community!
11/2024
.png?alt=media&token=a36f177c-cae8-4db1-a9e7-7c91e0cbb314)
Personal Development
Level Up Your Life: How to Grow Through the Game of Life
Life is like a video game. Each of us is the protagonist of our own story, navigating through challenges, overcoming obstacles, and constantly leveling up. To truly grow, we must pass through various stages—just like in a game—to unlock our full potential. In this blog, we’ll explore how you can level up in life, step by step, and transform yourself into the hero of your own adventure.
Level 1: Wake Up – It's Time to Level Up
The first step in any journey is realizing that the adventure begins now. To level up in life, you must first wake up to the idea that growth is intentional. It's easy to live on autopilot, going through the motions without questioning whether you’re improving. This level is all about self-awareness—recognizing where you are now and where you want to go. The game of life requires you to take control of your decisions and commit to your personal evolution.
Action Item: Start journaling your current state of mind, goals, and dreams. This will help you map out your journey ahead.
Level 2: Your Origin Story
Every hero has an origin story—so do you. Your past experiences, challenges, and failures have shaped who you are today. Rather than seeing them as roadblocks, treat them as key points in your personal development. This level is about accepting your past while focusing on what you can learn from it to move forward. You are the sum of your experiences, but they don’t have to define your future.
Action Item: Write your origin story. Reflect on the moments in your life that have had the most significant impact on shaping your character.
Level 3: Building Your Character
In any good game, you need to develop your character. In real life, this means identifying the traits, skills, and values that will serve you best. Are you working on becoming more disciplined? Do you need to develop a growth mindset? This level focuses on self-improvement—setting the foundation for your future self. The key is to actively work on areas that need development and embrace habits that enhance your overall character.
Action Item: Identify the skills or habits you need to develop. Start with small, manageable changes, and track your progress regularly.
Level 4: What’s Your Game Plan?
Every hero needs a strategy. In this level, it's time to create your game plan by setting long-term and short-term goals. Without clear objectives, you're wandering aimlessly through life. Your long-term goals are the grand visions you have for yourself—whether they are career ambitions, personal growth targets, or life achievements. Your short-term goals are the milestones that guide you along the way.
Action Item: Define one long-term goal and break it into short-term, achievable steps. Start with daily or weekly actions to build momentum.
Level 5: Building Your Bat Cave
Just as Batman has his Batcave, you need a safe and supportive environment to help you level up. This level is about creating a space—both mentally and physically—that nurtures your growth. Your Batcave could be your home, your workspace, or even your circle of supportive friends and mentors. Your environment significantly influences your mindset and productivity, so make sure it's conducive to your personal growth.
Action Item: Declutter your space, both physically and mentally. Create a positive environment that supports your goals.
Level 6: Get Ready for the Training Montage
Every great hero goes through a training montage where they push themselves to the limits. This is the phase of dedicated practice and hard work. Whether you're building a skill, learning something new, or improving your mental and physical health, this is the grind phase. Embrace the journey and keep your eyes on the prize—it won’t be easy, but it will be worth it.
Action Item: Pick one area of improvement (fitness, career, hobby) and commit to a 30-day challenge to make consistent progress.
Level 7: Join a Guild
No hero travels alone. At this stage, you need to find your tribe—people who share your values and aspirations. Surrounding yourself with positive, growth-oriented individuals can help you stay motivated and accountable. Whether it's a mastermind group, professional community, or social circle, the people you spend time with will significantly impact your journey. Choose wisely.
Action Item: Seek out a community that aligns with your goals. Join a group, attend events, or connect with like-minded individuals online.
Level 8: Slay the Dragon (Like Fear)
In every game, there's a dragon—or some version of it—that must be slain. In life, the dragon is often fear. Fear of failure, fear of rejection, or fear of the unknown can hold you back from leveling up. The only way to grow is to face these fears head-on. You don’t have to be fearless; you just have to act despite the fear.
Action Item: Identify one fear that's holding you back. Take one small action to confront that fear this week.
Level 9: Beat the Game Boss
Every game has a final boss, and in life, this represents your biggest challenge. It could be landing your dream job, completing a major project, or achieving a life goal that you've worked on for years. The game boss is intimidating, but you’ve been preparing for this moment since Level 1. With the skills, habits, and mindset you've cultivated, you're ready to win.
Action Item: Focus on the biggest challenge in your life right now. Break it down into smaller tasks and tackle it step by step.
Level 10: The Real World Is Your Playground
Congratulations—you've leveled up! But the game isn’t over. In fact, the real world is just beginning to open up as your playground. Now that you’ve conquered challenges, built yourself up, and beaten the game boss, it’s time to live boldly and explore new opportunities. Don’t rest on your laurels. Keep growing, keep learning, and remember that each new level in life brings new challenges and rewards.
Action Item: Celebrate your progress, but continue setting new goals to maintain momentum in your growth.
Additional Advice to Level Up
As you continue through the game of life, here are a few extra power-ups to help you level up faster and with more excitement:
-
The Power of Adventure: Life is an adventure—don’t shy away from trying new things. The unknown can be scary, but it also holds the greatest rewards.
-
Always Keep Moving Forward: No matter what, never stop progressing. Even small steps forward are better than standing still.
-
Let the Adventure Begin: There’s no better time than now to start leveling up. Embrace the journey and let the adventure guide you toward becoming the best version of yourself.
In the game of life, you are both the hero and the architect of your growth. Each level represents a step toward becoming the person you're meant to be. The key to leveling up is recognizing that personal growth is an ongoing process. So, are you ready to wake up and take your journey to the next level? Let the game begin!
10/2024
.png?alt=media&token=4da4a525-79ae-4aab-9378-e16362714151)
Personal Development
When Granted Everything, You Can’t Do Anything: How Too Many Options Can Lead to Paralysis
In a world where we’re constantly surrounded by limitless options—whether it’s for online courses, streaming platforms, career choices, or even hobbies—it’s easy to fall into the trap of "having everything, doing nothing." The freedom to choose anything often sounds empowering, but more often than not, it can lead to confusion, distraction, and an inability to make progress. This is something I’ve experienced firsthand, and it’s a challenge that many of us face in different aspects of life.
My Experience with Online Learning
A while back, I decided to take an online course on Udemy. I carefully picked a single course, completed it from start to finish, and felt incredibly proud of myself for sticking with it. I was focused, engaged, and had a clear goal in mind.
Then came the “big upgrade” — I subscribed to Udemy's monthly plan, which granted me access to an endless library of courses. I was excited at first, diving into a few new topics. But before I knew it, I was jumping from one course to another, sampling bits and pieces of everything, but completing nothing.
The more courses I explored, the more scattered my focus became. I had so many options that I couldn't commit to just one. In the end, the freedom to access everything left me feeling paralyzed and unproductive.
The Paradox of Choice
This is a classic case of what psychologists call the "paradox of choice." When you have too few options, you may feel restricted, but when you have too many, it can lead to overwhelming indecision. It’s a psychological concept that shows up in many areas of life.
Think about walking into an ice cream shop with only three flavors—vanilla, chocolate, and strawberry. Making a choice is pretty straightforward. Now imagine walking into a shop with 50 flavors. Suddenly, the decision becomes much harder. You sample a few, but you can’t settle on one, and eventually, you might just walk out, not even enjoying any ice cream at all.
In this way, too many choices can cause "decision fatigue." Instead of moving forward, we end up spending so much time weighing our options that we either make no choice at all or constantly second-guess the choice we did make.
Other Real-Life Examples
Streaming Services Overload
The same thing happens with entertainment. How many times have you opened Netflix, Hulu, or Disney+, only to scroll through endless options without actually deciding on anything to watch? You may have access to every show and movie you could possibly want, but the abundance of choice makes it harder to settle on just one thing.
We waste so much time browsing that we miss out on actually enjoying the content. I’ve even had evenings where I spent more time looking for a movie than actually watching one!
Career Path Dilemma
This issue doesn’t just exist in consumer behavior—it applies to bigger life decisions too. Many young professionals today are facing an overwhelming number of career options. With so many paths available—tech, entrepreneurship, freelancing, corporate jobs, creative industries, etc.—it’s easy to feel stuck in a loop of indecision.
The more options we consider, the more we feel pressure to make the “perfect” choice, which can paralyze us from moving forward. It’s not uncommon for people to feel lost, even when they have multiple career paths at their fingertips.
Hobbies and Interests
Another example is with hobbies. You might have a passion for painting, reading, writing, learning to play an instrument, or coding. But if you try to tackle all these hobbies at once, you might end up not really making meaningful progress in any of them. The excitement of having so many interests can fade when you're constantly switching between activities, leaving you feeling unsatisfied in all of them.
How to Overcome Choice Paralysis
-
Focus on One Goal at a Time
When I had just one Udemy course, I knew what I had to focus on, and it was easy to make progress. The same can be applied in any area. Pick one course, one hobby, or one project to focus on, and commit to completing it before moving on to the next. This focus helps reduce the mental clutter that comes with juggling too many options. -
Set Clear Priorities
Whether you’re deciding on what to learn next, what movie to watch, or which career path to take, setting clear priorities can help guide your decisions. What’s most important to you right now? Is it gaining a new skill, entertainment, or long-term growth? Use your priorities to narrow down your options and eliminate those that don’t align with your goals. -
Limit Your Options
It might seem counterintuitive, but limiting your choices can actually improve your decision-making. For example, if you’re choosing what to watch, narrow it down to two or three options and pick from there. If you’re exploring career paths, focus on one or two industries that excite you the most rather than trying to consider every possible option. -
Embrace Imperfect Decisions
Sometimes, the fear of making the wrong choice holds us back. It’s important to remember that no decision is perfect. Instead of seeking the "best" option, focus on making a "good" decision and move forward. You’ll learn and grow from whatever path you take. -
Take Breaks to Clear Your Mind
If you find yourself overwhelmed by too many options, take a break. Step away from the decision for a bit, and come back to it with a fresh perspective. Often, giving your mind some space helps clarify what you truly want.
Conclusion
It’s easy to think that more choices mean more freedom, but in reality, too many options can lead to feeling stuck, confused, and unproductive. Whether it’s choosing a course, a career, or even a hobby, narrowing your focus, setting clear priorities, and embracing imperfect decisions can help you break free from choice paralysis and move forward with purpose.
Remember, when granted everything, you can’t do anything—so choose wisely, focus intentionally, and move forward confidently.
Call to Action:
Have you ever felt overwhelmed by too many choices? How do you stay focused in a world full of endless possibilities? Share your thoughts in the comments below!
10/2024

Personal Development
The Alchemy of Life: 7 Powerful Lessons from *The Alchemist*
Life is often compared to a journey—a series of experiences, challenges, and milestones that shape us into who we are. Paulo Coelho’s The Alchemist beautifully captures this concept, weaving a tale of self-discovery, purpose, and transformation. It’s more than just a story; it’s a roadmap for anyone who dares to dream and embark on their own journey of life.
Here are the seven key lessons that stand out from The Alchemist, offering insights that can help guide us through the ups and downs of our personal and professional lives.
1. Chase Your Dreams
"When you want something, all the universe conspires in helping you to achieve it."
At the heart of The Alchemist is the idea that we must chase our dreams with everything we've got. Santiago, the protagonist, sets off in search of treasure—a metaphor for his deepest desires and ambitions. It’s easy to get caught up in the day-to-day grind, pushing our dreams aside in favor of stability or comfort. But the lesson here is clear: our dreams are what give life meaning. When we commit to pursuing them, opportunities arise, and the universe seems to work in our favor.
In a world full of distractions, it’s essential to stay focused on what truly matters to us. Whether it’s a career goal, a personal aspiration, or a passion project, don't let fear or doubt stand in your way.
2. Embrace Your Personal Legend
"To realize one’s Personal Legend is a person’s only real obligation."
The concept of a "Personal Legend" in The Alchemist represents one’s true purpose in life. It’s the idea that each of us has a unique path to follow, something we’re meant to achieve. Embracing this journey is crucial, even when the road ahead seems unclear.
What does this mean for us today? It’s about owning your life’s mission. Whether you're a leader, a creator, or someone still trying to find your way, acknowledging that you have a unique contribution to make is empowering. The journey won’t be easy, but understanding that you're on the right path gives you the resilience to keep moving forward.
3. Challenges Are Your Omens
"The secret of life, though, is to fall seven times and to get up eight times."
Challenges and obstacles aren’t just random occurrences—they are omens, guiding us toward growth. Santiago’s journey is full of hardships, from being robbed to nearly giving up on his dream. But each challenge teaches him something valuable, preparing him for what lies ahead.
In life, it’s tempting to view challenges as setbacks, but often they are opportunities in disguise. They push us out of our comfort zones and force us to develop new skills, perspectives, and strengths. When we face difficulties, it’s helpful to remember that these are not signs to stop, but rather signs pointing us toward growth. Embrace challenges as the lessons they are meant to be.
4. Fear of Failure
"Tell your heart that the fear of suffering is worse than the suffering itself."
One of the greatest obstacles we face is the fear of failure. In The Alchemist, Santiago experiences this fear as he faces the unknown, unsure of whether he will ever find his treasure. But fear of failure should never hold us back. In fact, the fear of failing is often more paralyzing than the failure itself.
Failure is inevitable, but it’s also an essential part of success. The key is to push through the fear, take risks, and learn from every experience. The worst thing we can do is let fear prevent us from even trying. As The Alchemist reminds us, it’s far better to take the leap and face potential failure than to live with the regret of never trying.
5. Listen to Your Heart
"People are afraid to pursue their most important dreams because they feel that they don’t deserve them, or that they’ll be unable to achieve them."
One of the most profound lessons from The Alchemist is the importance of listening to your heart. Santiago is repeatedly told to trust his heart, even when the path ahead seems uncertain. Your heart knows the way, even when your mind is clouded by doubt or external noise.
In the modern world, we are often bombarded with advice, expectations, and distractions. But your heart has its own wisdom—a deep, inner knowledge that can guide you if you learn to listen. Trusting your instincts and following what feels right, even when others doubt you, is often the best course of action.
6. The Treasure Within
"Remember that wherever your heart is, there you will find your treasure."
Throughout Santiago’s journey, he believes he’s in search of a physical treasure, only to realize that the true treasure lies within. The journey itself transforms him, and what he learns along the way becomes more valuable than any gold or riches.
This is a powerful metaphor for life. We often set goals or strive for achievements, thinking that external success will bring happiness. But in reality, the true treasure is the wisdom, experience, and growth we gain along the way. It’s not about the end result; it’s about who you become on the journey.
7. The Journey Is What Matters
"It’s the possibility of having a dream come true that makes life interesting."
Finally, The Alchemist teaches us that the journey is what matters most. Santiago’s story is a reminder that it’s not the destination but the experiences along the way that shape us. Life is a constant process of growth, discovery, and self-improvement. The treasure may be the goal, but the journey is where the magic happens.
In both personal and professional life, it’s easy to become fixated on the end result—achieving success, reaching a milestone, or completing a project. But it’s the journey, with all its ups and downs, that truly defines us. Enjoying the process and embracing every step, no matter how challenging, is the key to living a fulfilling life.
Conclusion
The lessons from The Alchemist are timeless and universal. They remind us to dream big, embrace our purpose, and view challenges as opportunities for growth. Whether you're at the start of your journey or deep in the process, these lessons can serve as a guide to help you navigate the complexities of life.
Ultimately, it’s not the destination that matters most, but the journey—the experiences, growth, and self-discovery along the way. So, chase your dreams, trust your heart, and remember: the treasure lies within you all along.
Key Takeaways:
- Pursue your dreams with passion and determination.
- Recognize that your purpose is unique and embrace it fully.
- See challenges as lessons guiding you forward.
- Push through fear, and don’t let the fear of failure hold you back.
- Trust your heart and its wisdom.
- Understand that the journey itself is the true treasure.
- Appreciate the process; it’s where growth and transformation happen.
10/2024

Technology and Gadgets
Filtering Data by Slug in GraphQL
If you’re working with a WordPress installation and need to fetch specific data using GraphQL, you can filter your queries by a slug. Here’s how you can do it:
Example Query:
query GetDestinationBySlug($slug: String!) {
  destinationBy(slug: $slug) {
    title
    Destinations {
      fullDescription {
        title
        FullDescription
      }
    }
  }
}
Explanation:
$slug: String!: This defines a variable namedslugthat must be provided (indicated by the exclamation mark!).destinationBy(slug: $slug): This is the part where we filter the results based on the provided slug. It returns the specific destination that matches the slug.- Inside the
destinationByblock, you can retrieve the desired fields, such as:title: The title of the destination.Destinations { fullDescription { title FullDescription } }: This retrieves the full description for the destination, including its title and full details.
Fetching Data Using JavaScript:
You can use the following JavaScript code to send the query to your WordPress GraphQL endpoint:
const fetchDestinationBySlug = async (slug) => {
  const query = `
    query GetDestinationBySlug($slug: String!) {
      destinationBy(slug: $slug) {
        title
        Destinations {
          fullDescription {
            title
            FullDescription
          }
        }
      }
    }
  `;

  const variables = { slug: slug };

  const response = await fetch('https://your-wordpress-site.com/graphql', {
    method: 'POST',
    headers: {
      'Content-Type': 'application/json',
    },
    body: JSON.stringify({
      query: query,
      variables: variables,
    }),
  });

  const result = await response.json();
  console.log(result.data.destinationBy);
};

// Example usage
fetchDestinationBySlug('example-slug');
Summary
This query is a great way to get precise data from your WordPress site using GraphQL! Feel free to reach out if you have any questions or need further assistance! 💬
10/2024
.png?alt=media&token=efb65f58-b08f-44ed-9a6a-1f87ac0bdd4e)
Personal Development
Achieve Tasks Productivity: A Complete Guide
Productivity is more than just getting things done; it’s about being effective in accomplishing your goals while maintaining balance. In this guide, we'll dive deep into the three key phases of achieving maximum productivity. We’ll also discuss bonus tips that will give you an extra edge in your daily life.
1. First Preparation Phase
This phase is all about setting yourself up for success before you even begin working. Planning and preparation can significantly increase productivity.
1.1 Set Your Sights
Before jumping into any task, take time to set clear goals and map out your approach.
- Plan what to do and how to do it in detail: Creating a detailed plan will help you avoid unnecessary confusion later. Break down your tasks into smaller, actionable steps that you can easily tackle.
1.2 Power Pareto (Pareto Principle)
The Pareto Principle, also known as the 80/20 rule, suggests that 20% of your work generates 80% of your results. Prioritizing effectively can make all the difference in your output.
- Prioritize essential tasks: Focus on tasks that have the highest impact on your goals.
- Fear Setting: While planning, foresee potential challenges and pitfalls. Understanding the worst-case scenarios can help you mitigate risks and approach tasks more confidently.
1.3 Batch Processing
Batch processing is about grouping similar tasks together and focusing on one type of task at a time.
- Full focus on a single task at a time: Instead of multitasking, dedicate uninterrupted time to each task. This helps improve concentration and efficiency.
2. Phase 2 Engage
Once you've planned and prepared, it’s time to dive into your tasks. This phase is about maintaining focus and clearing out distractions.
2.1 Focused Isolation
To stay productive, isolate yourself from distractions and interruptions. Use time blocking to dedicate specific time slots to different tasks or types of work.
- Time Blocking: Schedule blocks of time in your day to work on specific tasks. This structured approach helps ensure you devote sufficient attention to your most important tasks.
2.2 Clear the Clutter
A clear mind comes from a clear workspace.
- Distraction Note: Keep a “distraction note” nearby. Whenever an unrelated thought or task pops into your head, jot it down and continue with your current focus. This helps you keep distractions at bay without forgetting them.
3. Phase 3 Sustain
Sustaining productivity is about keeping momentum without burning out. This phase involves building habits that allow you to maintain a high level of focus and efficiency over time.
3.1 Activity Flow State
Achieving a flow state allows you to work at your most productive, feeling focused and immersed in the task. Follow these principles to stay in the zone:
- Define Your Goals: Know exactly what you're working towards.
- Track Your Progress: Set up a mechanism to track goals and milestones.
- Attention (No Multitasking): Focus on one task at a time. Multitasking divides your attention and decreases overall effectiveness.
- Develop Required Skills: Ensure that you have or are developing the skills needed to complete the task.
- Keep Raising the Stakes: Continuously challenge yourself by raising the level of difficulty or setting higher goals as you progress.
3.2 Keep the Pace
Maintaining your pace requires proper stress management.
- Manage Stress Levels: Moderate levels of stress can actually boost focus and energy. The key is balance; too little stress can lead to procrastination, while too much can cause burnout. Strive to maintain a balanced stress-energy level to stay focused.
4. Bonus Points
4.1 Be Genuine
At the heart of true productivity is a sense of authenticity and passion. If you’re genuinely interested in your work, you'll be more committed and effective.
- Take interest in your work: When you find joy and meaning in your tasks, you’ll be able to give your all. Don’t just do things for the sake of doing them—immerse yourself in your work and bring your passion to every task.
By following these steps, you can boost your productivity in meaningful ways. Whether it’s through preparation, focused engagement, or sustained effort, the key to achieving more is to work smarter, not harder. And don’t forget the bonus point—when you love what you do, productivity becomes a natural extension of your passion.
10/2024

Personal Development
Mastering Discipline: A Pathway to Greatness
Discipline is often misunderstood as strict routines and saying "no" to every temptation. But it’s far more than that—it’s about mastering your mind, emotions, and mindset. True discipline involves embracing discomfort, fostering growth, and finding joy in the journey, not just the destination. Here’s a breakdown of key principles to help you cultivate discipline and harness it for long-term success:
1️⃣ Urge Surfing: Ride the Waves of Temptation
We all experience moments of temptation—whether it's procrastinating, reaching for unhealthy snacks, or giving in to distractions. The practice of urge surfing teaches us how to navigate these moments without acting on them. Imagine your urges as waves in the ocean. Instead of being overwhelmed by them, learn to "surf" the impulse, observing it without giving in.
Impulse control is an essential skill. By not immediately responding to every craving, you train your mind to delay gratification and stay focused on your long-term goals.
Actionable Tip:
Next time you feel a temptation, pause for a few minutes. Breathe deeply and observe the urge. Let it pass, knowing that every time you resist, you strengthen your willpower.
2️⃣ Understand the Science of Discipline
Discipline isn’t just a matter of sheer willpower; it’s rooted in brain science. When you understand how your brain works, particularly in areas of motivation, reward, and impulse control, you can better manage your willpower and stay on track.
The brain's prefrontal cortex—responsible for decision-making and self-control—plays a crucial role in discipline. However, it tires out like a muscle after prolonged use. Understanding this helps you structure your day to manage your mental energy effectively.
Actionable Tip:
Prioritize challenging tasks early in the day when your brain’s decision-making power is at its peak. Save simpler or routine tasks for later in the day when willpower might wane.
3️⃣ Shift to a Long-Term Mindset
Discipline isn’t about quick fixes. It’s about adopting a long-term mindset, focusing on building a legacy rather than chasing short-term rewards. Think of discipline as a marathon, not a sprint. Small, consistent efforts compound over time, creating massive results.
Shifting your focus from instant gratification to long-term gains helps you stay the course, even when results aren’t immediately visible.
Actionable Tip:
Whenever you feel discouraged by a lack of quick progress, remind yourself of the bigger picture. Success is a series of small, consistent wins over time.
4️⃣ Daily Habits & Routines: Discipline Thrives in Structure
Discipline is born out of routine. Small, consistent actions lead to big results. Developing daily habits creates a structure that supports discipline, making it easier to stay focused and motivated.
Your habits are the foundation on which discipline thrives. When your actions become automatic, you conserve mental energy for more challenging tasks.
Actionable Tip:
Start by identifying one small habit you can build upon—whether it’s a 10-minute morning stretch, journaling, or reading. Stick to it daily until it becomes second nature.
5️⃣ Gratitude in Discipline
Discipline doesn’t have to be a chore. Cultivating gratitude for where you are and the progress you’ve made makes discipline easier to maintain. When you focus on the positives in your journey, you’re more likely to continue pushing forward.
Gratitude shifts your mindset from "I have to do this" to "I’m grateful for the opportunity to grow." This perspective can transform how you view discipline, making it a source of joy rather than a burden.
Actionable Tip:
At the end of each day, write down three things you're grateful for. Include the small victories in your journey towards your goals.
6️⃣ Willpower Fatigue: Protect Your Mental Energy
Willpower is a finite resource. Throughout the day, it depletes as you make decisions, resist temptations, and handle stress. This is known as willpower fatigue. Recognizing this allows you to prioritize important tasks early in the day, ensuring that you’re using your mental energy wisely.
By conserving your willpower, you create a system that supports long-term discipline, avoiding burnout or decision fatigue.
Actionable Tip:
Plan your most important tasks for the morning. Reduce decision-making later in the day by preparing meals, clothes, or to-do lists in advance.
7️⃣ Embrace Discomfort: Growth Happens Here
Discomfort is often seen as something to avoid, but in reality, discomfort is where growth happens. Whether it's pushing through a tough workout, tackling a challenging project, or resisting a craving, learning to embrace discomfort strengthens your resilience and discipline.
When you learn to lean into discomfort, you’ll start to see it as an opportunity for growth rather than something to fear. Over time, challenges become less daunting because you know they’re helping you become better.
Actionable Tip:
Whenever you face discomfort, remind yourself that it’s a sign of growth. Acknowledge the discomfort, but don't run from it—push through, knowing it’s making you stronger.
8️⃣ Enjoy the Process: Find Joy in the Journey
Discipline isn’t about punishment. In fact, it’s essential to enjoy the process if you want to maintain it long-term. When you view discipline as a tool for growth, learning, and progress, you can find joy even in the smallest steps forward.
Celebrate your victories, no matter how small. Acknowledge your progress along the way—it’s not just about the destination but about enjoying the journey itself.
Actionable Tip:
Take time to reflect on how far you’ve come. Celebrate milestones, and reward yourself for sticking to your habits. This positive reinforcement will make the process more enjoyable.
Conclusion: Discipline Is a Pathway to Greatness
Discipline isn’t a burden—it’s a pathway to achieving your highest potential. By practicing these key principles—riding the waves of temptation, embracing discomfort, protecting your willpower, and shifting your mindset—you’ll not only achieve your goals but also enjoy the process.
Discipline isn’t about perfection; it’s about progress. Every time you stay disciplined, you're investing in your future self. Mastering these principles will set you on the path to greatness.
💪 Discipline isn’t about being strict or rigid—it’s about growth, mindset, and finding joy in the journey. By following these rules, you’ll achieve your goals while learning to enjoy every step along the way.
Hashtags:
#Discipline #Mindset #Growth #DailyHabits #SelfDevelopment #EmbraceDiscomfort #Gratitude #LongTermSuccess
10/2024
.png?alt=media&token=6608a843-ea8d-4e31-a4d8-2d403866768d)
Technology and Gadgets
Starting a New Project: MIHU Website Builder
MIHU stands for “May I Help You.” We are building a cool website builder!
A Basic CMS for Everyone
We are creating a basic Content Management System (CMS). By "basic," we mean a simple, minimal, and handy tool to represent your business online. The best part? It’s going to be FREE!
Key Features
Users will have the ability to create a website with the following pages:
- Home Page
- About
- Services/Products
- Contact Us
The design will be responsive, ensuring a great look across various devices. Users will have control over the design, colors, content, and graphics. Unlike other platforms, there will be no advertisements! Just a clean and intuitive user interface.
How It All Started
On the Way to Building a Cool CMS
I initiated this project for several reasons:
-
Empowering Users: I want to provide a simple way for people to create their own web pages. We are targeting very basic users who can’t afford to hire a developer or agency but still need a website.
-
Challenging My Capabilities: I have always been eager to explore new technologies, and this project presents an exciting challenge that keeps me motivated to code.
-
Mobile-Friendly: Our goal is to enable users to create a website using just their mobile phones, making web development accessible to everyone.
How We’re Planning to Build It
This is an open-source project, and I am thrilled to have Himanshu collaborating with me. Everyone is welcome to contribute to this journey!
Cool Tools We’re Going to Use
We will build the website builder using the following tech stack:
- Next.js: A powerful framework for server-rendered React applications.
- React: For building the front end of our application.
- Vercel: Our hosting platform to deploy the website effortlessly.
- Firebase: For backend-as-a-service, providing real-time data and authentication.
- VS Code: The code editor we’ll use for development.
- GitHub: For managing our code and collaborating with contributors.
What Do We Want to Achieve?
We’re building this project out of passion. Our primary goal is to make a positive impact through our code. We want to create a product that people genuinely like and use. Our focus is on helping individuals in small and medium-sized businesses thrive online.
Thank you for following along with our journey! Stay tuned for updates as we progress with the MIHU Website Builder. If you're interested in contributing or have any questions, feel free to reach out!
09/2024

Technology and Gadgets
Building a Backend API with Email OTP Authentication and Image Uploads
In this blog post, I’ll be walking you through some core features I recently implemented in a backend API. These features include email OTP-based authentication, post uploading functionality with image handling, and user profile creation with profile image support.
1. Email OTP Authentication
What is OTP Authentication?
One-Time Password (OTP) authentication adds an extra layer of security to the user registration and login process. Instead of using a static password alone, users are required to enter a unique code (OTP) sent to their registered email.
Implementation Steps:
- Upon user registration or login, an OTP is generated and sent via email.
- Users input the OTP along with their credentials to authenticate.
- The OTP is validated server-side to ensure security and prevent unauthorized access.
Security Considerations:
- I ensured that each OTP is time-sensitive and cannot be reused.
- To avoid brute-force attacks, rate-limiting is applied on the OTP requests.
This feature significantly enhances the security of the system and ensures that users’ email addresses are verified.
2. Post Uploading with Image Support
In addition to standard text-based posts, I added the functionality for users to upload images with their posts. Here’s how I tackled image uploads:
Key Features:
- Multiple Image Formats: Support for various image formats such as
.png,.jpg, and.jpeg. - Image Upload Handling: The backend uses
MulterandCloudinaryfor handling file uploads. This ensures images are stored securely and optimized for web performance. - Image Validation: Files are validated for size and type, ensuring only appropriate images are uploaded.
User Flow:
- Users create a post with text content and upload an image.
- The image is stored on Cloudinary, and the URL is saved in the database.
- The post is then displayed with the associated image.
This feature adds rich media content to posts, making the platform more engaging.
3. Profile Creation with Image Upload
Allowing users to create and customize their profiles was another critical feature I implemented. In addition to standard profile details like name and bio, users can upload a profile picture.
Key Features:
- Image Upload for Profiles: Similar to post uploads, users can upload an image to be used as their profile picture.
- Image Processing: The profile image is processed, compressed, and optimized for faster loading times.
- Default Profile Picture: For users who don't upload a profile picture, a default avatar is displayed.
This makes the platform more personalized, enabling users to showcase their identity.
Final Thoughts
Building these core features has not only made the API more functional but also more user-friendly and secure. The email OTP authentication adds a critical layer of security, and the image uploading features help to enhance the overall user experience by allowing rich media and personalized profiles.
In future updates, I plan to:
- Expand on User Profiles with additional customization options.
- Optimize Image Handling by adding thumbnail support and further compressions.
- Integrate Social Features like likes, comments, and notifications to make the platform more interactive.
Stay tuned for more updates as I continue improving the platform!
Thanks for reading! Feel free to ask any questions or share your thoughts in the comments below.
09/2024

Technology and Gadgets
How to Install PostgreSQL on MacBook Pro M1 with Rosetta
The Apple M1 chip offers amazing performance improvements, but some software like PostgreSQL still faces compatibility issues. PostgreSQL is a popular database system used by many developers. On an M1 MacBook, installing PostgreSQL requires Rosetta, Apple's translation layer that enables Intel-based applications to run on M1 devices. In this blog, I'll walk you through the steps to install PostgreSQL on your M1 MacBook Pro.
What is Rosetta?
Rosetta is a dynamic binary translator that allows Intel-based apps to run on Apple Silicon (M1). Since many applications are still optimized for Intel architecture, Rosetta acts as a bridge.
Step 1: Install Rosetta 2
Before installing PostgreSQL, you'll need to install Rosetta if it's not already on your system. Open Terminal and run the following command:
softwareupdate --install-rosetta
Rosetta will now be installed, allowing your Mac to run Intel-based software like PostgreSQL.
Step 2: Install Homebrew
Homebrew is a package manager that simplifies installing and managing software on macOS. If you don't already have Homebrew installed, you can install it with the following command:
`/bin/bash -c "$(curl -fsSL https://raw.githubusercontent.com/Homebrew/install/HEAD/install.sh)"`
Once installed, run the following command to ensure Homebrew is working correctly:
brew doctor
Step 3: Install PostgreSQL
Now, let’s install PostgreSQL. Normally, you would install PostgreSQL using Homebrew, but due to compatibility issues with M1 chips, we need to run Homebrew under Rosetta.
First, create a new terminal window that runs under Rosetta:
- Go to Applications → Utilities.
- Right-click on Terminal and select "Get Info."
- Check the box labeled "Open using Rosetta."
- Open this Rosetta-enabled terminal.
Now, install PostgreSQL by running:
brew install postgresql
This ensures the Intel version of PostgreSQL is installed, which works seamlessly with Rosetta on your M1 MacBook.
Step 4: Start PostgreSQL
Once PostgreSQL is installed, you can start the PostgreSQL service with:
brew services start postgresql
To check if PostgreSQL is running:
pg_ctl -D /usr/local/var/postgres status
You can now access PostgreSQL by running:
psql postgre
Step 5: (Optional) Native M1 Version of PostgreSQL
If you prefer running PostgreSQL natively without Rosetta, you may explore alternatives such as using Docker to run a PostgreSQL container optimized for ARM architecture. While this method bypasses Rosetta, it may add complexity for some users.
Conclusion
Installing PostgreSQL on an M1 MacBook Pro may seem tricky due to the need for Rosetta, but following the steps above should get you up and running. As more software is optimized for Apple Silicon, this workaround may soon become unnecessary. For now, Rosetta is a lifesaver for getting Intel-based applications like PostgreSQL to work on your M1 Mac.
09/2024

Personal Development
Emotional Intelligence: The Key to Personal and Professional Success
In today's fast-paced world, Emotional Intelligence (EI) is often considered as important, if not more, than intellectual ability. But what exactly is emotional intelligence, and how does it impact our lives? Let's dive into this essential skill and understand how developing emotional intelligence can lead to better relationships, improved decision-making, and overall personal growth.
What is Emotional Intelligence?
Emotional Intelligence, also known as Emotional Quotient (EQ), is the ability to recognize, understand, and manage your own emotions while also being able to recognize and influence the emotions of others. EI is not just about handling emotions effectively; it also involves using emotional insight to navigate social complexities, resolve conflicts, and build stronger connections with others.
The Five Components of Emotional Intelligence
According to psychologist Daniel Goleman, emotional intelligence can be broken down into five key components:
-
Self-Awareness
Self-awareness is the foundation of emotional intelligence. It involves recognizing your emotions and understanding how they affect your thoughts and actions. Being self-aware helps you identify your strengths and weaknesses, which is essential for personal growth. -
Self-Regulation
Once you are aware of your emotions, the next step is managing them. Self-regulation is about controlling impulsive feelings and behaviors, staying composed in stressful situations, and taking responsibility for your actions. -
Motivation
Emotionally intelligent people are motivated by factors beyond external rewards like money or status. They have a passion for their work and a drive to achieve personal fulfillment. This inner motivation often leads to high levels of productivity and persistence, even in the face of challenges. -
Empathy
Empathy is the ability to understand and share the feelings of others. It involves putting yourself in someone else’s shoes and recognizing their emotions. Empathy is crucial in building and maintaining relationships, both personally and professionally. -
Social Skills
Effective communication, conflict resolution, and collaboration are key components of strong social skills. Emotionally intelligent individuals are able to navigate social situations with ease, build rapport, and foster positive relationships.
Why is Emotional Intelligence Important?
Emotional intelligence plays a vital role in nearly every aspect of life:
-
Improved Relationships: Being able to understand and manage your emotions helps you communicate better and form deeper connections with others. EI allows you to respond more thoughtfully in difficult conversations, which can prevent misunderstandings and strengthen relationships.
-
Enhanced Decision-Making: High EQ enables individuals to evaluate emotions logically, making more balanced and informed decisions. It helps in maintaining a calm and focused approach, even in high-pressure situations.
-
Better Leadership: Leaders with high emotional intelligence inspire trust and foster a positive work environment. They are able to manage teams effectively by understanding the emotional needs of their employees and guiding them toward success.
-
Stress Management: Recognizing emotional triggers and learning how to respond calmly allows emotionally intelligent people to handle stress more effectively. This, in turn, reduces burnout and improves overall mental well-being.
How to Improve Your Emotional Intelligence
Emotional intelligence is a skill that can be developed over time. Here are a few ways to enhance your EI:
-
Practice Self-Reflection: Take time to analyze your emotions and how they influence your behavior. Journaling your experiences can help you identify emotional patterns and areas for improvement.
-
Mindfulness Meditation: Regular mindfulness practice can help you stay grounded in the present moment, making it easier to manage intense emotions and stay calm under pressure.
-
Active Listening: When in conversation, focus not just on the words but also on the emotions being conveyed. This will help you respond more empathetically and build stronger connections.
-
Seek Feedback: Ask friends, family, or colleagues for feedback on how you handle emotions or respond to situations. This can provide valuable insights for growth.
-
Empathy Practice: Make a conscious effort to understand other people’s feelings. Pay attention to non-verbal cues, body language, and tone of voice to better grasp the emotions of others.
Conclusion
Emotional intelligence is a crucial skill for navigating both personal and professional life. By becoming more self-aware, regulating your emotions, and practicing empathy, you can improve your relationships, make better decisions, and lead a more fulfilling life. Unlike IQ, which remains relatively stable, emotional intelligence can be developed and refined at any stage of life, offering endless opportunities for personal growth.
Start today by reflecting on your own emotional patterns, and take small steps toward becoming more emotionally intelligent. You’ll soon notice the positive impact it has on your well-being and success.
Interested in learning more about personal growth? Explore related topics such as Mindfulness, Self-Reflection, and Building Resilience.
09/2024

Health and Wellness
Ghee Coffee: The New Health Trend You Should Know About
If you're looking for a new way to kickstart your mornings, ghee coffee might be the answer. This unique drink has been gaining popularity in health-conscious circles for its potential benefits, offering a rich, creamy twist on your typical cup of joe. But what exactly is ghee coffee, and why are so many people incorporating it into their routines?
What is Ghee Coffee?
Ghee coffee is a variation of bulletproof coffee, which traditionally combines coffee with butter or MCT oil. In ghee coffee, the butter is replaced with ghee, a clarified butter that has been used in Indian cooking and Ayurvedic practices for centuries.
Ghee is made by simmering butter to remove water and milk solids, leaving behind pure butterfat. It has a nutty flavor and a higher smoke point than regular butter, making it an excellent choice for cooking and, in this case, for mixing with coffee.
Ingredients You Need for Ghee Coffee
To make a basic cup of ghee coffee, you'll need:
- 1 cup of brewed coffee (preferably organic)
- 1 tablespoon of ghee
- Optional: 1 teaspoon of MCT oil or coconut oil for an extra energy boost
How to Make Ghee Coffee
Making ghee coffee is simple:
- Brew your coffee as usual.
- Add a tablespoon of ghee to the coffee.
- Optionally, add a teaspoon of MCT oil or coconut oil.
- Blend the mixture using a blender or immersion blender until it becomes frothy and smooth.
Now, you have a creamy, rich coffee that’s ready to fuel your day!
Why Drink Ghee Coffee?
Ghee coffee isn't just about taste—there are several potential benefits that come with adding ghee to your coffee.
1. Boosts Energy and Mental Clarity
Ghee is a source of healthy fats that provide a steady stream of energy. Pair that with the caffeine in coffee, and you get a drink that can boost both your physical and mental performance. The fats in ghee help slow the absorption of caffeine, leading to a more sustained energy release without the sudden crash that traditional coffee can cause.
2. Supports Weight Loss
The healthy fats in ghee can help with appetite control and prevent cravings. Some people on ketogenic or low-carb diets have found that ghee coffee helps them maintain their fasting windows or eat less during the day. By providing fat as a source of fuel, it can help the body transition into a fat-burning state.
3. Rich in Essential Nutrients
Ghee is loaded with fat-soluble vitamins like vitamins A, D, E, and K. These are essential for everything from bone health to immune support. Adding ghee to your coffee gives you a morning dose of these key nutrients.
4. Aids Digestion
In Ayurvedic medicine, ghee is prized for its digestive benefits. It’s known to stimulate the secretion of stomach acids, aiding digestion and helping with the absorption of nutrients. For people who experience digestive discomfort with regular coffee, ghee coffee may offer a smoother alternative.
5. Promotes Heart Health
Though high in fat, ghee contains omega-3 fatty acids and conjugated linoleic acid (CLA), both of which have been linked to heart health. When consumed in moderation, these fats can support cardiovascular function and overall health.
Is Ghee Coffee Right for You?
While ghee coffee has many potential benefits, it's important to note that it’s high in calories and fat. If you're watching your caloric intake or have dietary restrictions around fats, it might not be the best option for you.
However, for those on low-carb, keto, or intermittent fasting diets, ghee coffee can be a helpful addition to your routine. It offers a sustained energy boost and can help you stay in a fat-burning state longer.
Conclusion
Ghee coffee is more than just a trendy drink—it’s a delicious, nutrient-rich way to start your day. Whether you're looking for more energy, better mental clarity, or digestive support, this creamy concoction may be just what you need.
As with any dietary change, it’s important to listen to your body. If you find that ghee coffee works for you, it can be a simple and satisfying addition to your morning routine.
Have you tried ghee coffee yet? Let us know how it worked for you in the comments!
References:
09/2024

Technology and Gadgets
Building a Streak System in React with Firebase
Introduction
Streak systems are popular features in many apps to keep users engaged. Whether it's a language-learning app like Duolingo or a productivity tool, tracking how often users return can boost retention. In this blog, we'll walk through building a streak-like system using React and Firebase. This system will track users' daily activities and reward them for consecutive days of participation.
Prerequisites
To follow along, you should have:
- Basic Knowledge of React
- A Firebase Project set up (Authentication and Firestore)
Firebase Setup
If you haven't already, start by setting up Firebase in your project. Run the following command to install the Firebase SDK:
npm install firebase
Next, initialize fierbase in your project by adding fierbase config
// firebase.js
import { initializeApp } from "firebase/app";
import { getFirestore } from "firebase/firestore";
import { getAuth } from "firebase/auth";

const firebaseConfig = {
  apiKey: "YOUR_API_KEY",
  authDomain: "YOUR_AUTH_DOMAIN",
  projectId: "YOUR_PROJECT_ID",
  storageBucket: "YOUR_STORAGE_BUCKET",
  messagingSenderId: "YOUR_MESSAGING_SENDER_ID",
  appId: "YOUR_APP_ID",
};

const app = initializeApp(firebaseConfig);
const db = getFirestore(app);
const auth = getAuth(app);

export { db, auth };
Step 2: Authentication
For simplicity, we'll use Firebase Authentication to track which user is logged in. You can implement email/password authentication or Google sign-in for your app. Firebase makes it easy to authenticate users.
import { onAuthStateChanged } from "firebase/auth";
import { auth } from "./firebase"; // Firebase config

useEffect(() => {
  onAuthStateChanged(auth, (user) => {
    if (user) {
      console.log("User logged in:", user);
    } else {
      console.log("No user logged in");
    }
  });
}, []);
Step 3: Setup Firestore
Our streak system will store each user’s streak count and the last day they were active in Firestore. The basic structure for each user will look like this:
users: {
  userId: {
    streakCount: 3,            // Number of consecutive days
    lastActive: Timestamp,      // Last day of activity
  }
}
Step 4: implementing Streak Logic
Now, let's implement the logic to track streaks. We'll check if the user was active yesterday and update their streak accordingly. If they missed a day, the streak will reset.
import { doc, getDoc, setDoc, updateDoc, serverTimestamp } from "firebase/firestore";
import { db } from "./firebase"; // Firebase config
import { useEffect, useState } from "react";
import { Timestamp } from "firebase/firestore";

function StreakSystem() {
  const [user, setUser] = useState(null);
  const [streak, setStreak] = useState(0);

  useEffect(() => {
    // Assuming the user is already logged in
    const checkStreak = async (userId) => {
      const userRef = doc(db, "users", userId);
      const userSnap = await getDoc(userRef);

      const today = new Date();
      today.setHours(0, 0, 0, 0); // Normalize time

      if (userSnap.exists()) {
        const { lastActive, streakCount } = userSnap.data();
        const lastActiveDate = lastActive.toDate();
        lastActiveDate.setHours(0, 0, 0, 0);

        const diffInDays = (today - lastActiveDate) / (1000 * 3600 * 24);

        if (diffInDays === 1) {
          // Continue the streak
          await updateDoc(userRef, { streakCount: streakCount + 1, lastActive: serverTimestamp() });
          setStreak(streakCount + 1);
        } else if (diffInDays > 1) {
          // Reset the streak
          await updateDoc(userRef, { streakCount: 1, lastActive: serverTimestamp() });
          setStreak(1);
        } else {
          // Already active today
          setStreak(streakCount);
        }
      } else {
        // First time logging activity
        await setDoc(userRef, { streakCount: 1, lastActive: serverTimestamp() });
        setStreak(1);
      }
    };

    // Call checkStreak for the current user
    if (user) {
      checkStreak(user.uid);
    }
  }, [user]);

  return (
    <div>
      <h1>Your current streak: {streak} days</h1>
    </div>
  );
}

export default StreakSystem;
Step 5: Display the Streak
In this component, the streak value will be dynamically updated each time a user logs in. You can style this part of the UI to show the user how many consecutive days they've been active.
return (
  <div>
    {user ? (
      <div>
        <h1>Welcome back, {user.email}</h1>
        <p>Your current streak: {streak} days</p>
      </div>
    ) : (
      <p>Please log in to see your streak.</p>
    )}
  </div>
);
Step 6: Additional Features (optional)
Now that the basic system is in place, you can build upon it by adding features like:
-Rewards for milestones: Give badges or points for maintaining long streaks.
-Reminder notifications: Send push notifications or emails to remind users to log in before their streak resets.
-Detailed activity tracking: Instead of just logging activity, you can track specific actions like completing tasks or making posts.
Conclusion
By following this tutorial, you've built a functional streak system in React using Firebase. This is a simple but powerful feature that encourages user engagement through daily activity. Firebase’s real-time database and authentication make it easy to track user-specific data, and React makes it simple to display that information.
09/2024
.png?alt=media&token=64051521-8e19-4797-8653-81521f7ea5ba)
Personal Development
Self Motivation: Unlocking Your Inner Drive
In a world filled with distractions and challenges, self-motivation is the key to achieving personal and professional goals. It’s the inner drive that propels us forward, helping us overcome obstacles and maintain focus on our objectives. Understanding the different types of motivation, the core pillars that support them, and practical steps to enhance your self-motivation can lead to a more fulfilling and productive life.
Types of Motivation
Motivation can be broadly categorized into two main types: intrinsic and extrinsic. Each plays a unique role in driving our behaviors and influencing our goals.
1. Intrinsic Motivation
Intrinsic motivation is derived from within. It’s the enjoyment and satisfaction you gain from completing a task or mastering a skill. When you engage in activities for their own sake—because they are enjoyable or challenging—you are intrinsically motivated.
- Examples:
- Learning a new language for the joy of speaking it.
- Engaging in a hobby, such as painting or playing an instrument, without any external rewards.
- Benefits:
- Increased creativity and engagement.
- Higher levels of satisfaction and fulfillment.
- Greater resilience in the face of challenges.
2. Extrinsic Motivation
Extrinsic motivation, on the other hand, relies on external rewards or pressures. This could include monetary rewards, grades, praise, or recognition from others. While extrinsic motivation can be effective in prompting action, it may not sustain long-term engagement.
-
Examples:
- Working overtime for a bonus.
- Studying hard for an exam to achieve a good grade.
-
Benefits:
- Can produce quick results.
- Effective in driving specific behaviors, especially in competitive environments.
While both types of motivation are important, cultivating intrinsic motivation leads to deeper, more sustainable engagement with tasks and goals.
Three Pillars of Motivation
To build a strong foundation for self-motivation, consider these three essential pillars: autonomy, mastery, and purpose.
1. Autonomy
Autonomy refers to the ability to take control of your own work and make decisions that align with your values and interests. When individuals feel they have the freedom to choose how they approach tasks, they are more likely to be motivated and engaged.
- Strategies for Enhancing Autonomy:
- Set your own goals and timelines.
- Choose projects that resonate with your interests.
- Advocate for flexible work arrangements when possible.
2. Mastery
Mastery is the desire to improve and excel in a particular area. It is the motivation to continually develop skills and achieve competence. Engaging in activities that promote mastery can create a sense of accomplishment and satisfaction.
- Ways to Foster Mastery:
- Seek feedback on your performance.
- Take on challenges that push your limits.
- Invest time in training or workshops to hone your skills.
3. Purpose
Having a clear sense of purpose involves understanding the broader impact of your work and setting meaningful goals. When individuals connect their daily tasks to a larger vision, they find more significant motivation.
- Cultivating Purpose:
- Define your long-term goals and aspirations.
- Reflect on how your work contributes to the well-being of others or the community.
- Create a vision board to visualize your goals and keep them front of mind.
Five Actions to Take
To harness self-motivation, consider implementing these five actionable steps:
Step 1: Ask Yourself Your Life's Biggest Goal
Take time to reflect on what truly matters to you. What is your ultimate goal? Identifying this can provide clarity and direction in your life.
- Questions to Consider:
- What do I want to achieve in the next five years?
- What legacy do I want to leave behind?
Step 2: Find When You Are Most Focused
Identify the times of day when you feel most energized and focused. Utilize these peak hours for your most important tasks.
- Tips:
- Keep a journal to track your energy levels throughout the day.
- Experiment with different schedules to find your optimal work times.
Step 3: Focus on Small Steps
Break down your larger goals into smaller, manageable tasks. This makes the process less overwhelming and allows you to celebrate small victories along the way.
- Example:
- If your goal is to write a book, set a daily word count target rather than focusing solely on the final product.
Step 4: Check Daily If You Are Improving
Regularly assess your progress to stay accountable and motivated. Reflect on your achievements and areas for improvement.
- How to Track Progress:
- Use a habit tracker or journal to note daily achievements.
- Schedule weekly reviews to evaluate your progress and adjust your strategies if needed.
Step 5: Make a Personal Motivational Reminder
Create a personal reminder that resonates with you. This could be a quote, image, or mantra that inspires you to keep pushing forward.
- Suggestions:
- Place your reminder where you’ll see it daily (e.g., your desk, phone background).
- Change it periodically to keep it fresh and relevant.
Conclusion
Motivation is an essential component of success, but it must be paired with discipline to create lasting change. Discipline helps you stay committed to your goals even when motivation wanes. By combining both motivation and discipline, you can navigate the challenges of life more effectively, turning aspirations into achievements.
Embrace your self-motivation journey, leveraging intrinsic and extrinsic motivation, while nurturing autonomy, mastery, and purpose. With clear goals and actionable steps, you have the power to unlock your inner drive and realize your dreams.
09/2024

Personal Development
The Power of Positivity: 10 Key Aspects of Self-Improvement
Becoming the best version of yourself isn’t just about setting goals and working hard—it’s about cultivating a positive mindset in all areas of your life. Here are ten critical elements of self-improvement that focus on developing a positive inner world, which in turn shapes how you see yourself and interact with others.
1. Positive Self-Awareness
Everything starts with self-awareness. Positive self-awareness means having an honest and compassionate understanding of who you are, including your strengths, weaknesses, thoughts, and emotions. It’s about accepting yourself fully without judgment.
Why it matters: When you know yourself well, you can better understand why you react the way you do and how to grow from experiences. This awareness is the foundation of personal growth.
Tip: Practice mindfulness or journaling to stay connected to your thoughts and emotions.
2. Positive Self-Image
Your self-image is how you perceive yourself. A positive self-image doesn’t mean thinking you're perfect; it means seeing yourself in a kind, balanced way. You recognize both your strengths and areas for improvement without letting negative thoughts dominate.
Why it matters: A healthy self-image leads to higher confidence and better decision-making. You stop second-guessing yourself and start believing in your potential.
Tip: When negative thoughts about yourself arise, consciously challenge them. Replace self-criticism with affirmations that focus on your positive qualities.
3. Positive Self-Esteem
Self-esteem is how much you value yourself. Positive self-esteem means believing you are worthy, regardless of external validation. It’s about feeling good about who you are, not because of what you achieve, but because of your inherent worth.
Why it matters: High self-esteem boosts resilience, helping you bounce back from setbacks and embrace challenges with optimism.
Tip: Celebrate small wins and practice self-compassion when things don’t go as planned.
4. Positive Self-Expectation
What do you expect from yourself in life? Positive self-expectation means believing that good things are possible for you. It’s about setting high standards and expecting success, while also being realistic about the work required.
Why it matters: When you expect great things from yourself, you're more likely to take action and make them happen. Positive self-expectation creates a sense of purpose and drives motivation.
Tip: Visualize your goals regularly and affirm your belief in your ability to achieve them.
5. Positive Self-Direction
Self-direction is about taking control of your life and making conscious choices that align with your values and goals. Positive self-direction means guiding yourself toward your desired future, rather than drifting aimlessly or letting others steer your path.
Why it matters: When you have a clear sense of direction, you become more focused and motivated. You take intentional steps toward what truly matters to you.
Tip: Set short-term and long-term goals to keep yourself on track. Make sure your daily actions are aligned with your bigger life vision.
6. Positive Self-Motivation
Staying motivated can be tough, especially when life throws obstacles in your way. Positive self-motivation is about maintaining the internal drive to keep moving forward, even when challenges arise. It’s about finding meaning in what you do and pushing yourself to keep growing.
Why it matters: Motivation is the fuel for success. Without it, even the best-laid plans can fall apart. Positive self-motivation helps you keep your eyes on the prize.
Tip: Identify your “why” behind your goals. When you have a clear reason, it’s easier to stay motivated through tough times.
7. Positive Self-Discipline
Self-discipline is the ability to stick to your commitments and follow through on your plans. Positive self-discipline isn’t about punishing yourself but creating habits that lead to long-term success.
Why it matters: Discipline is the bridge between goals and accomplishments. It’s what keeps you consistent, even when you don’t feel like putting in the effort.
Tip: Break your goals down into daily habits. Focus on small, consistent actions that build momentum over time.
8. Positive Self-Control
Self-control is your ability to manage impulses and stay focused on what’s important. Positive self-control helps you avoid distractions and make choices that are in your best interest, even when it’s tempting to stray.
Why it matters: With self-control, you can navigate stressful situations and resist short-term temptations that could derail your progress.
Tip: Practice delaying gratification. When you feel the urge to stray from your goals, pause and remind yourself of your long-term objectives.
9. Positive Self-Projection
Self-projection is how you present yourself to the world. Positive self-projection means confidently sharing your authentic self with others, projecting warmth, kindness, and competence.
Why it matters: How you project yourself can shape how others perceive you, but more importantly, it shapes how you see yourself. Projecting positivity builds connections and boosts your own self-confidence.
Tip: Practice body language that reflects confidence—stand tall, make eye contact, and smile.
10. Positive Self-Dimension
Finally, positive self-dimension is about recognizing that you’re part of something bigger. It’s about seeing yourself as someone who can make a positive impact on the world and acknowledging the multiple roles you play in life—friend, partner, professional, and so on.
Why it matters: When you see yourself as connected to a larger purpose, it adds meaning and depth to your life. This perspective fosters gratitude and keeps you grounded.
Tip: Reflect on the positive impact you can have on the people and communities around you.
Conclusion
Positivity isn’t just about thinking happy thoughts; it’s about cultivating a mindset that drives meaningful action. By focusing on these ten aspects—self-awareness, self-image, self-esteem, self-expectation, self-direction, self-motivation, self-discipline, self-control, self-projection, and self-dimension—you can build a strong foundation for personal growth. Embrace the power of positivity, and watch how it transforms your life from the inside out.
09/2024

Personal Development
Make Time for Everything (Even with a Full-Time Job)
Finding time for everything can seem impossible, especially when you’re working full-time. But with a little planning and some intentional choices, you can make time for what really matters without feeling burnt out. Here’s how you can do it, one step at a time.
Level 1: Start Auditing Your Time
The first step is to get real about where your time is going. Spend a week tracking your activities—everything from your work hours to how long you scroll on social media. You might be surprised at how much time gets lost to little things that don’t actually move the needle.
Why it works: Auditing your time gives you a clear picture of where you’re being productive and where time is slipping away. It’s like looking at your budget before deciding how to spend money—you can’t make smart decisions without knowing the full story.
Tip: Use an app or a notebook to jot down how you spend each hour of the day. Even the small stuff counts!
Level 2: Clarify Your Objective
Once you know where your time goes, the next step is to figure out what you want to do with it. What are your big goals? Whether it's building a side hustle, getting in shape, or learning a new skill, having a clear focus helps you prioritize.
Why it works: When you have a clear objective, it’s easier to make decisions about how to spend your time. You’ll naturally gravitate towards activities that align with your goals.
Tip: Write down your top 1-3 priorities for the next few months. Keep them somewhere visible so you’re reminded of what matters most.
Level 3: Cut Out the Noise
Now that you know your goals and how you’re spending time, it’s time to cut the fluff. Look at your audit from Level 1—what can you cut out? Maybe it’s scrolling social media during lunch or binge-watching TV after work. These things aren’t inherently bad, but if they’re eating up time without giving you much in return, they might need to go.
Why it works: Simplifying your day by cutting out unnecessary distractions gives you more time to focus on the things that bring real value to your life.
Tip: Start small—cut back on one or two time-wasters and see how much more you can get done. You’ll be surprised!
Level 4: Structure Your Day
Now, it’s time to plan your day with intention. Create a structure that works for you. Maybe that’s time-blocking, where you dedicate specific chunks of time for different tasks, or setting aside time each morning or evening for personal projects.
Why it works: A structured day reduces decision fatigue, giving you more mental energy to focus on your goals. Plus, when you know what your day looks like in advance, it’s easier to stay on track.
Tip: Start your day with the most important task first. That way, even if the rest of your day goes sideways, you’ve already accomplished something meaningful.
Level 5: Check Your Energy Levels
It’s not just about time—it’s about energy. Pay attention to when you’re naturally more focused and energetic during the day. If you’re a morning person, tackle your most demanding tasks early. If you hit your stride after lunch, plan around that.
Why it works: Working with your natural energy rhythms means you’re doing your best work when you’re feeling your best, leading to higher productivity and less burnout.
Tip: Notice when your energy dips throughout the day and schedule lighter tasks or breaks during those times.
Level 6: Use Weekends to Build, Not Escape
Weekends are a great opportunity to recharge, but they can also be a time to work on things that matter to you. Instead of using weekends solely for relaxation or distractions, carve out time to work on building the life you want—whether it’s learning something new, planning for the week ahead, or pursuing a passion project.
Why it works: Using your weekends intentionally lets you invest in yourself without the usual weekday stress. It’s a time to reflect, strategize, and make progress on your goals.
Tip: Give yourself a mix of rest and productive time on the weekends. Even an hour or two dedicated to a personal project can add up over time.
Level 7: Make Your Job Work for You
Finally, make your job work for you instead of the other way around. This doesn’t mean slacking off at work, but rather, finding ways to make your job fit into your life, not consume it. Look for ways to streamline tasks, say no to unnecessary meetings, or negotiate for more flexible hours if possible.
Why it works: If you’re constantly fighting against your job, it’s hard to make time for anything else. When your job supports your lifestyle, you’ll find it easier to balance work and life.
Tip: If you can’t change your job, change how you approach it. Manage expectations, communicate boundaries, and look for small adjustments that can make a big difference.
Conclusion
Making time for everything, even with a full-time job, is not about doing it all—it’s about doing the right things. By auditing your time, cutting out distractions, and focusing on what really matters, you can find the balance you need to work on your goals while still excelling at your job. Remember, time management isn’t about cramming more into your day; it’s about creating space for what matters most.
09/2024

Personal Development
The Power of Focus: Why Deep Work is the Key to Productivity
In today's fast-paced, distraction-filled world, productivity often feels like an elusive goal. We jump from one task to another, constantly interrupted by notifications, emails, or social media. But what if there was a better way to get things done? This is where the concept of deep work comes in—a powerful, focused method of working that can dramatically improve your productivity and the quality of your output.
What is Deep Work?
Coined by author and professor Cal Newport in his book Deep Work: Rules for Focused Success in a Distracted World, deep work refers to the ability to focus without distraction on a cognitively demanding task. In contrast to shallow work (tasks that are often fragmented and don’t require much brainpower, like answering emails or attending meetings), deep work pushes you to your mental limits and allows you to produce high-quality results.
The Power of Focus
When you engage in deep work, you’re entering a state of flow—a period of complete concentration where time seems to fly by, and your brain is functioning at its peak. During these periods of intense focus, the brain’s ability to process complex ideas and solve challenging problems is heightened, leading to much greater productivity and creativity.
By eliminating distractions and focusing on a single task, you allow your brain to engage fully. This results in higher-quality output because your mind isn't scattered. In fact, research shows that it can take up to 23 minutes to fully refocus on a task after an interruption. So, deep work isn’t just about working more—it’s about working smarter.
Why Deep Work is Essential for Productivity:
-
Boosts Cognitive Performance
Deep work forces you to use your brain in its most productive state. You’re solving complex problems, learning new skills, or producing high-value work. The more you practice deep work, the better you become at concentrating, and the more you accomplish. -
Higher Quality Output
When you focus solely on one task for a prolonged period, you’re able to think more critically and creatively. Whether it's writing, coding, designing, or strategizing, the quality of your output improves when you’re not constantly switching tasks or being interrupted. -
Time Efficiency
Although it might seem counterintuitive, taking time to engage in deep work actually saves time. When you’re fully focused, you’re not wasting mental energy on distractions. As a result, tasks that could take hours when performed in a distracted manner may take only a fraction of the time. -
Develops Mastery
Deep work pushes your mental capabilities to their limit, allowing you to get better at what you do. Over time, this leads to mastery in your field. It’s like exercising a muscle—the more you engage in deep, focused work, the stronger your ability to think and solve problems becomes. -
Reduces Stress and Burnout
Constant multitasking and shallow work lead to mental fatigue. Deep work, on the other hand, allows you to get more done in less time, meaning you can finish your workday feeling accomplished rather than drained. It promotes a healthier work-life balance by making your time spent working more meaningful and productive.
How to Implement Deep Work in Your Life
Achieving deep work isn’t about willpower alone; it requires intentional effort and structure. Here’s how you can start practicing deep work today:
-
Set Dedicated Time Blocks
Carve out specific times in your day to engage in uninterrupted, focused work. It could be as little as one hour of deep work, but during that time, turn off distractions, notifications, and focus solely on the task at hand. -
Prioritize Tasks that Matter
Use deep work sessions for tasks that truly matter—projects that require deep thinking, learning, or creativity. Shallow tasks can be scheduled separately. -
Eliminate Distractions
Create an environment conducive to focus. This might mean turning off your phone, finding a quiet workspace, or using tools like website blockers to avoid social media during work sessions. -
Practice Regularly
Deep work is a skill that takes time to develop. Start small—perhaps a single 90-minute session a day—and gradually increase the time as you build your focus muscles. -
Track Your Progress
Measure how much you’re able to accomplish during deep work sessions. You’ll likely find that the more you practice, the more productive and creative you become.
Conclusion: Deep Work is the Future of Productivity
In a world full of distractions, being able to focus deeply on one task is a superpower. Those who cultivate the ability to perform deep work will not only boost their productivity but also excel in their careers by producing higher-quality results and mastering their field.
If you're struggling to get things done or feel overwhelmed by constant interruptions, try embracing the deep work mindset. It might just transform the way you work—and live.
09/2024

Personal Development
Mastering Learning with the Laser Method
Learning is a lifelong journey, and while the destination may vary, the path often gets clouded by distractions, ineffective strategies, or even a lack of purpose. To help clear the path and make learning more impactful, we have the Laser Method, a simple yet powerful approach that structures the learning process in a way that ensures better understanding, retention, and application of knowledge.
The Laser Method can be broken down into five key steps:
- L = Lock In
- A = Absorb
- S = Synthesis
- E = Express
- R = Review
Let’s walk through each step in detail and see how it transforms learning into a meaningful experience.
1. L = Lock In: Finding Your Why
Before you dive into any learning process, ask yourself "Why am I learning this?" This is the core of the Lock In phase—finding the purpose behind your learning. If you don’t have a clear reason, learning can feel like a chore. When you "lock in," you're essentially identifying what drives you to learn, making it easier to stay motivated, focused, and engaged.
- Example: If you’re learning a new programming language, think about how mastering it will help you get a better job, create your dream project, or solve a problem you’ve been struggling with. This “why” acts as a mental anchor, pulling you toward your goal when you feel like giving up.
2. A = Absorb: Taking in Information
Now that you’ve locked in on your "why," it’s time to Absorb information. This phase is where the intake of knowledge happens. You can absorb information through reading, watching videos, attending lectures, or practicing hands-on tasks.
- Tip: Find your best method for absorption. Some people are visual learners, while others might absorb better by listening or through interaction. Adapt the resources that fit your style.
Absorbing isn’t just about cramming; it’s about understanding and engaging with the material, which means being curious, asking questions, and making connections to real-life experiences.
3. S = Synthesis: Relating and Retaining
The Synthesis phase is where real learning happens. It's not just about remembering information but relating it to something meaningful in your life. Synthesis is about asking yourself: “How is this beneficial to me?” and “How can I apply it?”
- Tip: Make connections. If you’re learning a historical event, ask yourself how it shaped the present world or your community. If you’re studying a scientific concept, relate it to something in your daily life—like how physics explains the movement of objects you use every day.
When you synthesize, you organize the information in a way that makes sense to you, leading to better retention and understanding.
4. E = Express: The Power of Teaching and Feedback
The Express step revolves around four key actions:
- Choose a concept to learn.
- Teach it to someone.
- Identify knowledge gaps.
- Go back to your notes and review them.
Teaching is one of the most effective ways to solidify your understanding. When you explain a topic to someone else, you simplify complex ideas and identify any gaps in your own knowledge. The gaps become obvious when you struggle to explain a concept clearly. Once you find these gaps, go back to your notes, reread, and fill in the missing pieces.
- Tip: You don’t need a classroom for this—teach a friend, family member, or even an imaginary audience! The point is to verbalize and clarify your understanding.
5. R = Review: The Key to Long-Term Retention
No matter how well you absorb, synthesize, or express information, if you don’t Review it regularly, it will fade over time. This is where the Forgetting Curve comes into play.
The Forgetting Curve, developed by psychologist Hermann Ebbinghaus, shows how quickly we forget information if we don’t review it. The curve indicates that without reinforcement, you can lose up to 70% of what you’ve learned within 24 hours!
- Solution: The way to combat the Forgetting Curve is through spaced repetition. Review your material at increasing intervals—after one day, a week, a month, etc. Each time you review, your brain strengthens the memory, and over time, you retain more.
Real-Life Application of the Laser Method
Let’s imagine you’re learning a new skill—say, photography.
- Lock In: Why are you learning photography? Maybe you want to capture beautiful moments on your travels, or you’re considering a career in photography.
- Absorb: Watch tutorials, read guides, and practice with your camera.
- Synthesis: Think about how photography can enhance your travel experiences or help you express your creative side.
- Express: Teach the basics of photography to a friend. While explaining, you might realize you’re unsure about the exposure triangle. That’s a knowledge gap to fill.
- Review: After a week, revisit your notes on camera settings and composition, and practice again. Keep reviewing every so often to reinforce your skills.
Conclusion
The Laser Method is a practical framework that transforms passive learning into an active, meaningful experience. By Locking In on your "why," Absorbing relevant information, Synthesizing it into your life, Expressing your understanding through teaching, and Reviewing to ensure long-term retention, you become a more effective learner.
In a world full of distractions and endless information, the Laser Method helps you stay focused and learn with purpose. Whether you're picking up a new skill, studying for an exam, or pursuing a passion, this method can guide you toward mastery.
Ready to try the Laser Method? Start by Locking In on your next learning goal, and let the journey begin!
09/2024
Personal Development
Empty Your Mind: The Art of Mental Decluttering
In today's fast-paced world, our minds are constantly bombarded with information, tasks, and responsibilities. Whether it's work, relationships, or social media, the never-ending stream of thoughts can often lead to stress, anxiety, and mental fatigue. But what if we could find peace amidst this chaos? The key lies in one powerful concept: emptying your mind.
What Does It Mean to Empty Your Mind?
Emptying your mind doesn’t mean forgetting everything or suppressing your thoughts. It’s about creating space for clarity, focus, and calm. Imagine your mind as a cluttered room filled with old furniture, junk, and unused items. To make room for something new, you need to declutter first. Similarly, emptying your mind helps you clear out unnecessary thoughts, making way for creativity, mindfulness, and relaxation.
Why Should You Empty Your Mind?
-
Reduces Stress: A cluttered mind is often a stressed mind. When your brain is constantly juggling different thoughts, it becomes overwhelming. Emptying your mind allows you to release the tension, providing relief from the daily pressures.
-
Improves Focus: When your mind is free from distractions, you can focus better on the task at hand. This heightened concentration leads to greater productivity and efficiency.
-
Boosts Creativity: Creative thinking thrives in a calm and open mental space. By emptying your mind, you give your brain the freedom to explore new ideas without the noise of everyday distractions.
-
Enhances Mindfulness: A clear mind is more receptive to being present in the moment. Practicing mindfulness becomes easier when your thoughts aren’t constantly racing, leading to better mental and emotional well-being.
Techniques to Empty Your Mind
-
Meditation: Meditation is one of the most effective ways to declutter your mind. Even a few minutes of deep breathing or mindfulness meditation can help you let go of unnecessary thoughts. Focus on your breath, and as thoughts arise, acknowledge them and gently let them pass without judgment.
-
Journaling: Writing down your thoughts can be a cathartic way to empty your mind. Journaling helps you release pent-up emotions, organize your thoughts, and gain insight into what’s occupying your mental space. Once it’s on paper, you’ll often feel lighter and more clear-headed.
-
Physical Activity: Movement can help shift mental clutter. Exercise, whether it’s yoga, a brisk walk, or hitting the gym, allows your body to release built-up tension and can serve as a form of mental reset.
-
Mindful Breathing: Simple breathing exercises can instantly calm a busy mind. Take deep, slow breaths, inhaling through your nose and exhaling through your mouth. Focus on the rhythm of your breath, letting go of any lingering thoughts.
-
Disconnect from Technology: Our digital lives contribute significantly to mental clutter. Try stepping away from screens, even if only for a short period. This digital detox will help reduce the information overload and give your mind a chance to recharge.
-
Visualize a Blank Slate: When you feel overwhelmed, close your eyes and visualize a blank canvas or an empty room. Imagine placing all your thoughts, worries, and distractions onto that canvas, then slowly erasing or clearing it away. This mental imagery can be incredibly calming.
The Benefits of an Emptied Mind
An empty mind isn’t about silence or inactivity—it’s about creating mental space for what truly matters. By practicing the art of mental decluttering, you’ll find that you’re more present, creative, and energized. Stress will no longer weigh you down, and you’ll approach life with a greater sense of clarity and purpose.
In a world where we're often encouraged to do more, think more, and achieve more, emptying your mind might just be the secret to finding balance and peace. Take a step back, breathe, and allow yourself to experience the beauty of a mind at rest.
Conclusion
Emptying your mind is not a one-time event, but rather a practice that requires patience and consistency. By integrating these simple techniques into your daily routine, you’ll notice a profound shift in your mental and emotional well-being. So, the next time life feels overwhelming, remember to pause, declutter, and make room for peace within.
Let go of the mental noise, embrace clarity, and experience the tranquility of an empty mind.
09/2024
.png?alt=media&token=717b8f65-d064-4bf5-9223-0104bd501f0d)
Technology and Gadgets
WordPress Custom Theme Development vs. Elementor: Which One Should You Choose?
When it comes to building a website in WordPress, there are two popular approaches: custom theme development and using a page builder like Elementor. Each method has its pros and cons, and the right choice depends on your project’s needs, your level of technical expertise, and the website’s long-term goals.
Let’s break down the differences to help you decide which approach is best for your next WordPress project.
What is WordPress Custom Theme Development?
Custom theme development involves building a theme from scratch or heavily customizing an existing one. You’ll write the code yourself (using PHP, HTML, CSS, and JavaScript) or hire a developer to create a unique theme that matches your design and functionality needs.
Pros of Custom Theme Development:
- Full Control: You have complete control over the design, structure, and features of the website. You can tailor the theme to meet specific requirements without any limitations.
- Optimized Performance: A custom theme can be lightweight and optimized for performance since it only includes the code and features you need, making your site faster and more efficient.
- Scalability: It’s easier to add advanced features and grow your site over time when you control the underlying code.
- Unique Design: Your website can have a completely original design that sets it apart from other sites using pre-built themes or page builders.
Cons of Custom Theme Development:
- Requires Technical Skills: You’ll need to know (or hire someone who knows) web development languages like PHP, CSS, and JavaScript.
- Time-Consuming: Building a theme from scratch can take longer than using a page builder since everything is custom-built.
- Higher Cost: Custom theme development often costs more, especially if you’re working with a developer.
What is Elementor (or Any Page Builder)?
Elementor and similar page builders like Divi and WPBakery are tools that allow you to create WordPress websites without writing code. They offer a drag-and-drop interface with pre-designed templates and elements, making it easy to customize the look and feel of your site visually.
Pros of Using Elementor (or a Page Builder):
- Ease of Use: Page builders are user-friendly, allowing anyone—even those without coding skills—to design a website by simply dragging and dropping elements.
- Quick Setup: You can have a fully functional website up and running much faster than with custom theme development, thanks to pre-built templates and design blocks.
- Flexibility: Even though you’re not coding, page builders offer a high level of flexibility with various design options and customizable settings.
- No Need for Developers: Non-technical users can build and manage their websites without needing a developer for every change or update.
Cons of Using Elementor (or a Page Builder):
- Performance Issues: Page builders often add extra code and scripts, which can slow down your website if not optimized properly.
- Limited Customization: While flexible, page builders may have limitations when it comes to fully custom designs or unique functionality.
- Bloated Code: The code generated by page builders is often bulkier compared to custom theme code, which can impact SEO and loading times.
Key Differences Between Custom Theme Development and Elementor
1. Customization
- Custom Theme: You have unlimited design possibilities. The site can be tailored exactly to your vision, making it ideal for businesses with specific branding and functionality requirements.
- Elementor: Although highly customizable, page builders can be limiting if you want to go beyond what the tool offers. It’s great for basic to moderately complex designs, but fully custom elements can be more challenging to implement.
2. Performance
- Custom Theme: With only the necessary code, a custom-built theme tends to be leaner and faster. You have more control over optimizations like caching, image loading, and minifying files.
- Elementor: The drag-and-drop interface can generate bloated code, which may slow down the site. However, performance can still be decent with proper optimization techniques (like caching and image compression).
3. Development Time
- Custom Theme: Custom development takes longer because every aspect of the theme is designed and coded from scratch or with significant customization.
- Elementor: You can build a website quickly, using pre-built templates and design elements. This is perfect for projects with tight deadlines or for users who need to get a site live fast.
4. Cost
- Custom Theme: Developing a custom theme can be expensive, especially if you’re hiring a professional developer. The initial investment is higher, but it pays off with a highly tailored website.
- Elementor: Page builders are generally cheaper upfront since you’re not paying for custom code. However, some advanced features or premium templates may require purchasing a paid version of the builder.
5. Ease of Use
- Custom Theme: Managing a custom-built theme may require more technical knowledge or ongoing support from a developer, especially for more advanced features or updates.
- Elementor: The user-friendly interface makes it easy for non-developers to manage, update, and modify their site without writing any code.
When to Use WordPress Custom Theme Development
- You Need Full Customization: If your project has very specific design requirements or needs complex functionality, custom theme development is the way to go.
- Long-Term Scalability: If you’re building a site that will grow over time, custom development gives you more flexibility to add features, scale performance, and maintain code quality.
- Branding and Unique Identity: For businesses that need a unique, one-of-a-kind design, custom development offers endless possibilities.
When to Use Elementor (or a Page Builder)
- You Need to Build a Website Quickly: If you’re under a time crunch, Elementor allows you to launch a professional-looking website in a fraction of the time.
- Budget Constraints: Page builders are more affordable for individuals or small businesses that don’t need a custom solution.
- Non-Technical Users: If you don’t have a developer or don’t want to rely on one for updates, Elementor is a great way to take control of your website without learning how to code.
Conclusion
Choosing between custom theme development and Elementor (or any page builder) depends on your project’s goals, budget, and long-term vision. If you need a fast, cost-effective solution that’s easy to manage, a page builder like Elementor may be the right choice. However, if you’re looking for a unique, scalable, and high-performance website, investing in custom theme development is the way to go.
Both approaches have their strengths—it's all about finding the one that aligns with your needs!
09/2024
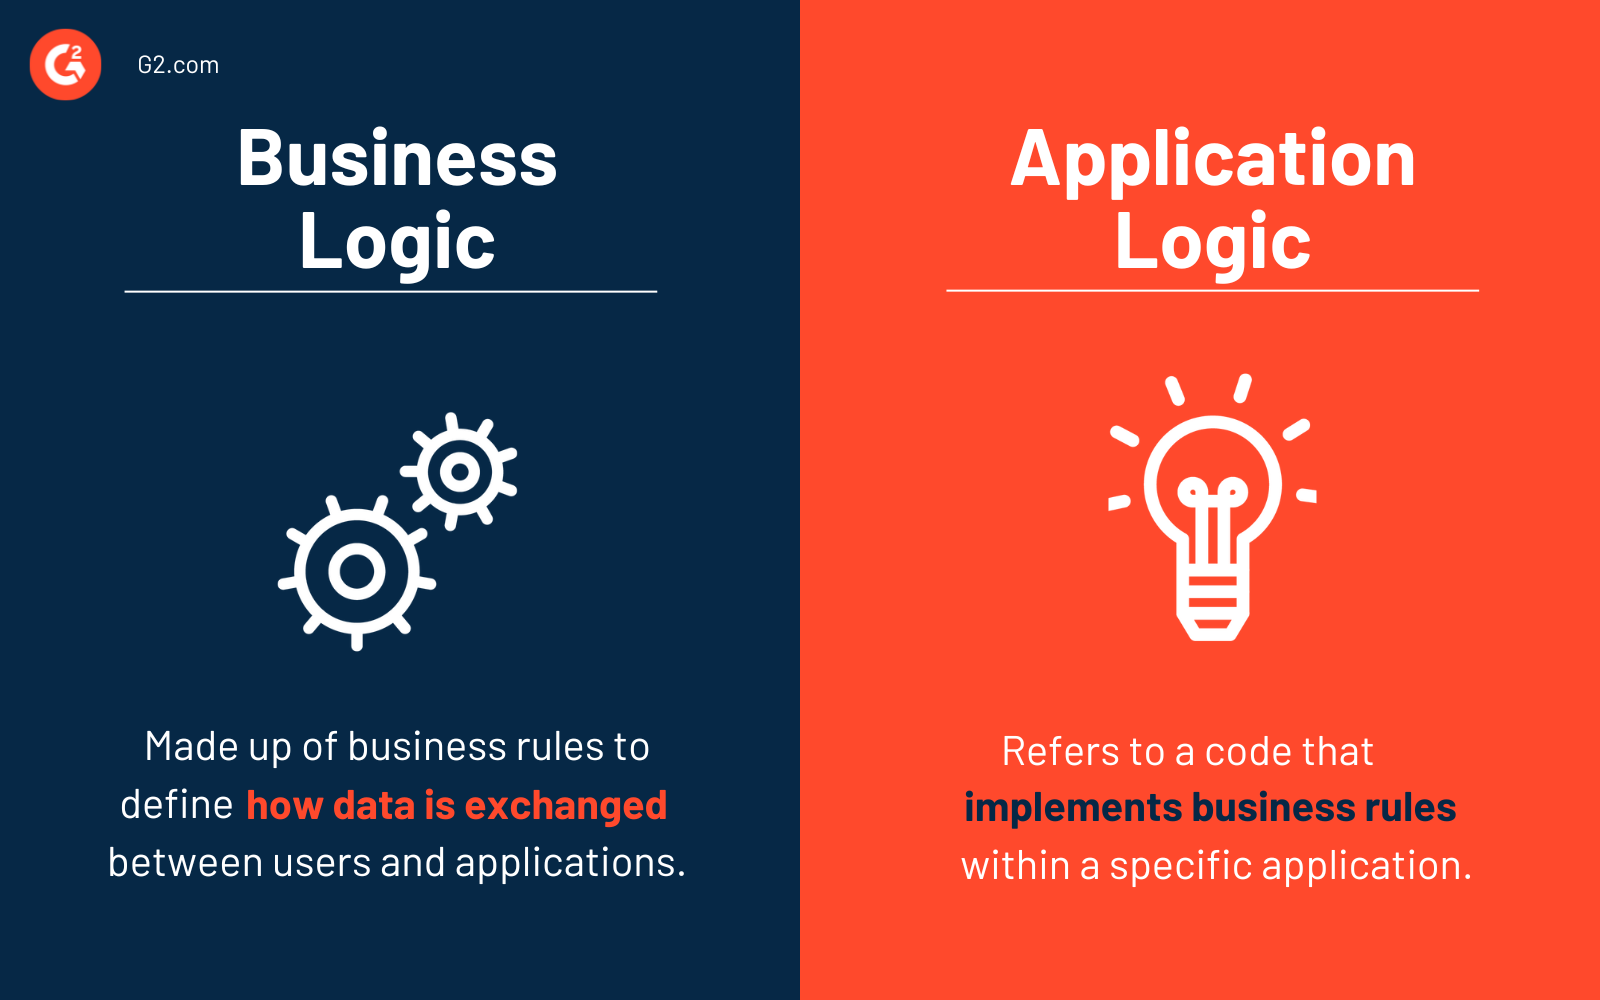
Technology and Gadgets
Why You Need to Sketch Business Logic Before Development
When building software, it can be tempting to jump straight into coding. After all, writing the application and seeing results quickly is exciting! But before you start hammering out code, one crucial step is often overlooked: sketching the business logic. This step is essential for the success of your project. Let’s explore why defining business logic early on is critical and how it saves you from headaches later.
What is Business Logic?
Business logic refers to the rules and processes that govern how data flows and how decisions are made within your software. It encompasses everything from how users interact with the system to how data is stored, processed, and retrieved.
Think of it as the core blueprint that outlines:
- How features should behave.
- What actions the system should take in specific scenarios.
- The rules that govern how data is transformed.
Why You Should Sketch the Business Logic First
1. Clarity and Focus
Before writing any code, it's essential to have a clear vision of what the software is supposed to do. Sketching the business logic gives you that focus. It allows you to break down complex problems into smaller, manageable parts and see how different components interact.
Without a clear understanding of business logic, developers might misunderstand requirements, leading to functionality that doesn’t meet business needs.
2. Avoids Costly Rework
If you start coding without first defining how your system should behave, you run the risk of major revisions later. Imagine building out a feature only to realize you misunderstood a key requirement. Now, not only do you have to rewrite the code, but this change might impact other parts of the application.
Sketching out the business logic beforehand ensures you and your team are aligned from the start, preventing costly rewrites and scope creep.
3. Bridges the Gap Between Business and Development
Business stakeholders don’t always speak “developer language,” and developers may not fully understand the business side of things. Sketching the business logic serves as a bridge.
When you outline the logic, you create a document that both developers and business people can understand. This ensures that both teams are on the same page before any development begins.
4. Efficient Use of Resources
Time is money. By defining business logic first, you minimize guesswork during development. Developers can move faster, knowing exactly what they need to build. This also makes the development process more predictable and efficient, with fewer roadblocks and misunderstandings along the way.
5. Ensures Scalability
Sketching out business logic forces you to think about scalability. You can plan ahead for potential growth, changes, or new features. For example, will your logic still hold if your user base grows from 1,000 to 100,000? What happens if new regulations are introduced that affect how you process data?
Thinking through these scenarios early allows you to build a more scalable and flexible system.
6. Improves Testing and Debugging
When business logic is sketched out in advance, it makes creating test cases much easier. You already know the rules and expected outcomes, so testing becomes more straightforward. It also speeds up debugging when things go wrong, as you can compare what’s happening in the code to the expected business logic.
7. Supports Team Collaboration
Clear business logic fosters collaboration. When everyone has access to the same blueprint, team members—from developers to testers to product managers—can work together more effectively. It also helps onboard new team members, as they can quickly understand the purpose and structure of the system.
How to Sketch Business Logic Effectively
Sketching business logic doesn’t need to be overly complicated. Here are some practical steps you can take:
-
Identify Key Scenarios: Write down all the critical scenarios your application must handle. For example, if you’re building an e-commerce app, outline the logic for adding items to the cart, processing payments, and sending order confirmations.
-
Flowcharts or Diagrams: Visualizing the logic in the form of flowcharts, diagrams, or even bullet points can help you and your team see the big picture. Tools like Lucidchart or simple whiteboard sketches can be incredibly useful.
-
Define Inputs and Outputs: Make sure you understand what inputs your system will receive and what outputs it will produce. This ensures that your logic accounts for all necessary variables.
-
Iterate and Refine: Business logic doesn’t have to be perfect on the first draft. Involve key stakeholders and iterate on the logic as you receive feedback. The goal is to get as close as possible to a finalized version before development starts.
Conclusion
Sketching the business logic before starting development is like creating a map before embarking on a journey. It ensures that you stay on track, avoid costly mistakes, and build a product that meets the needs of both users and stakeholders. While it might feel like an extra step, it’s a step that pays off in the long run, saving time, money, and frustration.
In short, sketching business logic first is the foundation that will guide your project to success!
09/2024

Technology and Gadgets
GraphQL vs REST API: A Comparative Overview
When building APIs, two major paradigms often come into play: REST (Representational State Transfer) and GraphQL. Both have their strengths, weaknesses, and distinct use cases. Let's dive into their key differences and when to choose one over the other.
What is REST?
REST is an architectural style for designing networked applications. It relies on standard HTTP methods (GET, POST, PUT, DELETE) to perform CRUD operations (Create, Read, Update, Delete) on resources. In REST, each resource is represented by a URL, and the server responds with data in formats like JSON or XML.
Key Features of REST:
- Stateless: Each request contains all necessary information, so the server doesn’t store session data.
- Standardized Methods: HTTP methods map directly to actions (GET for reading, POST for creating, etc.).
- Multiple Endpoints: Different URLs represent different resources, leading to multiple endpoints.
What is GraphQL?
GraphQL, developed by Facebook, is a query language for APIs and a runtime for executing queries. Instead of multiple endpoints, GraphQL exposes a single endpoint that allows clients to specify exactly what data they need, no more and no less.
Key Features of GraphQL:
- Single Endpoint: All requests go through a single endpoint.
- Precise Data Fetching: Clients can request specific fields, avoiding over-fetching or under-fetching of data.
- Real-time Updates: Supports subscriptions for real-time data fetching.
Key Differences: GraphQL vs. REST
1. Data Fetching
- REST: Often leads to over-fetching (getting more data than needed) or under-fetching (requiring multiple requests to get all necessary data). For example, a client might fetch an entire user profile when only the username is needed.
- GraphQL: Allows the client to request exactly the fields it needs, eliminating over-fetching and under-fetching issues. This can be particularly useful for mobile applications with limited bandwidth.
2. Endpoints
- REST: Multiple endpoints are typically created for each resource. For example:
/usersfor user data/ordersfor order data
- GraphQL: Uses a single endpoint. The structure of the query dictates what data is returned, so there's no need for multiple endpoints.
3. Versioning
- REST: API versioning is common in REST. For example, you might see URLs like
/api/v1/users. As APIs evolve, new versions must be created to avoid breaking changes. - GraphQL: Handles versioning internally. Instead of creating new versions, fields can be added or deprecated over time, allowing backward compatibility without multiple versions.
4. Performance
- REST: Performance can suffer if multiple resources need to be fetched, as REST may require multiple HTTP calls.
- GraphQL: Batching requests allows GraphQL to fetch all the necessary data in a single call, improving performance in some cases. However, improper query structure in GraphQL can lead to N+1 query problems, where one query leads to many sub-queries.
5. Caching
- REST: REST APIs can leverage HTTP caching mechanisms like ETags and Cache-Control headers. Caching responses is easier due to the predictable nature of REST URLs and HTTP methods.
- GraphQL: Caching in GraphQL is more complex since every query is unique. While there are tools (like Apollo Client) that offer caching, it isn't as straightforward as REST's HTTP-based caching.
6. Error Handling
- REST: HTTP status codes (like 404 for Not Found, 500 for Server Error) are used to indicate the outcome of requests.
- GraphQL: Errors are handled in a more granular way. Even if part of the query fails, other parts might still return successfully. Errors are returned within the response body, not as status codes.
When to Choose REST
- Simple APIs: If you're building a straightforward API where each resource can be easily mapped to an endpoint, REST may be sufficient.
- HTTP Caching: REST makes HTTP caching easy and powerful, making it ideal if you heavily rely on caching.
- Established Tooling: REST has been around for a long time, and there are plenty of tools and libraries to help developers.
When to Choose GraphQL
- Complex APIs: If your API involves retrieving deeply nested data, GraphQL shines by allowing clients to specify exactly what they need.
- Mobile Applications: For mobile apps where bandwidth is a concern, GraphQL helps by reducing over-fetching and optimizing data transfer.
- Real-Time Data: If your application relies on real-time updates, GraphQL’s subscriptions feature makes it easy to implement live data streams.
Conclusion
Both GraphQL and REST have their place in API development. REST is simpler, easier to cache, and works well with standardized HTTP methods. GraphQL is more flexible, especially for complex, data-heavy applications where precision and optimization matter. The right choice depends on your specific use case, the structure of your data, and how your clients will interact with your API.
09/2024

Technology and Gadgets
Windows, macOS, Linux, and Chromium OS: The Battle of Operating Systems
When it comes to choosing an operating system, the four major contenders are Windows, macOS, Linux, and Chromium OS. Each has its own strengths, quirks, and ideal use cases. Whether you're a casual user, developer, gamer, or just need a lightweight system for the web, selecting the right OS depends on your specific needs. Let’s break down the pros and cons of each to help you make an informed choice.
Windows: The All-Rounder
Overview
Windows, developed by Microsoft, is the most widely used operating system globally. Known for its versatility, it’s a favorite among businesses, gamers, and everyday users alike.
Pros
- Software Compatibility: Almost all major software, from Microsoft Office to Adobe Creative Suite and countless games, runs natively on Windows.
- Gaming: Windows is the top choice for gamers due to its broad support for game titles and hardware like GPUs.
- User-Friendly: Familiar to most users with its graphical interface, intuitive settings, and ease of use.
- Hardware Support: Works on a wide variety of hardware, giving users freedom to customize their PCs.
Cons
- Security Risks: Being the most popular OS makes it a frequent target for malware and viruses.
- Bloatware: Often comes pre-installed with unnecessary software.
- Cost: Unlike Linux, Windows is proprietary software and requires a paid license.
Best For
- Gamers
- Businesses
- General users looking for a broad range of software options
macOS: The Sleek Innovator
Overview
macOS, developed by Apple, is known for its sleek design, intuitive interface, and integration with the Apple ecosystem. It’s the go-to choice for many creative professionals.
Pros
- Design and UI: macOS is known for its clean and visually appealing interface.
- Optimized Hardware: Apple’s closed ecosystem ensures hardware and software work seamlessly together, leading to less lag and fewer crashes.
- Security: macOS has fewer security vulnerabilities compared to Windows.
- Creative Software: Many creative professionals prefer macOS for applications like Final Cut Pro, Logic Pro, and Adobe Creative Suite.
Cons
- Limited Hardware Choices: Only runs on Apple hardware, which is often expensive.
- Less Software Support: While many applications are available, macOS has fewer gaming and specialized software options compared to Windows.
- Customizability: Limited customization options compared to Linux or even Windows.
Best For
- Designers, video editors, and creative professionals
- Users deeply integrated into the Apple ecosystem (iPhone, iPad, etc.)
- Those prioritizing security and a smooth, polished interface
Linux: The Power of Open-Source
Overview
Linux is an open-source operating system that comes in many distributions, such as Ubuntu, Fedora, and Arch. It’s a favorite among developers, sysadmins, and tech enthusiasts due to its flexibility, security, and customization options.
Pros
- Free and Open-Source: Linux is free to use and can be customized to fit any need. You can modify the source code as you see fit.
- Security: Due to its open-source nature, vulnerabilities are quickly patched, and the system is inherently more secure.
- Customizability: You can configure almost every aspect of the OS, from the desktop environment to the kernel itself.
- Resource-Efficient: Linux can run on a wide range of hardware, including older or less powerful machines.
Cons
- Steep Learning Curve: While some distributions like Ubuntu are user-friendly, many aspects of Linux can be daunting for beginners.
- Software Compatibility: Many mainstream software applications and games don’t run natively on Linux, though there are alternatives and workarounds (e.g., Wine or virtual machines).
- Hardware Compatibility: Some hardware drivers (especially for peripherals) may not work well with Linux without manual configuration.
Best For
- Developers and system administrators
- Tech enthusiasts looking for an open and customizable environment
- Those needing a lightweight OS for older machines
Chromium OS: The Lightweight Web-Centric System
Overview
Chromium OS is an open-source operating system developed by Google, designed to be lightweight and optimized for web-based applications. It's the foundation for Chrome OS, which powers Chromebooks and focuses primarily on cloud computing.
Pros
- Lightweight and Fast: Built primarily for web-based apps, Chromium OS is incredibly light, making it ideal for lower-end hardware.
- Google Integration: Works seamlessly with Google services like Drive, Gmail, and Docs, making it perfect for users deeply embedded in the Google ecosystem.
- Security: Due to its web-centric nature and automatic updates, Chromium OS offers robust security.
- Affordable Hardware: Chromebooks, the hardware that runs Chrome OS, are generally more affordable than Windows or macOS devices.
Cons
- Limited Software Support: While excellent for web apps, Chromium OS lacks support for traditional desktop applications like Photoshop or MS Office.
- Offline Limitations: While some apps offer offline modes, Chromium OS is primarily designed for online use, limiting its functionality without an internet connection.
- Customizability: Unlike Linux, Chromium OS offers very limited customization options.
Best For
- Students and casual users who primarily use web applications
- Those looking for a lightweight, low-cost, and secure system
- Users who rely heavily on Google services
Final Thoughts: Which One is Right for You?
Choosing between Windows, macOS, Linux, and Chromium OS depends largely on your personal needs:
- If you’re a gamer or need compatibility with a wide array of software, Windows is likely your best bet.
- If you prioritize a smooth, well-designed interface and work in the creative industry, macOS could be the ideal choice.
- If you love customization, prioritize security, and enjoy a challenge, Linux might be the perfect fit for you.
- If you mostly work online and need a simple, affordable system, Chromium OS could be the ideal solution.
Each operating system has its strengths and weaknesses, so understanding what you need from your OS is key to making the right decision.
Which OS do you prefer? Let us know your experience and which one works best for your workflow in the comments below!
09/2024

Personal Development
Embracing Boredom: The Unexpected Key to Creativity
In today's fast-paced world, boredom is often seen as an enemy. We fill every moment with screens, notifications, and endless entertainment. But what if boredom is more than just a dull, empty feeling? What if it’s a gateway to creativity, reflection, and personal growth?
The Modern Battle Against Boredom
With technology at our fingertips, it's easier than ever to avoid boredom. From social media feeds to binge-watching entire seasons of shows, we’re constantly bombarded with ways to stay entertained. The idea of being bored for even a few minutes can feel unbearable. But this constant stimulation may be doing more harm than good.
The Science Behind Boredom
Studies show that boredom is a natural state of mind that arises when our brains are under-stimulated. It’s a signal that we need to seek something new or different. When we don’t allow ourselves to experience boredom, we rob ourselves of an opportunity for mental rest and reset.
Boredom activates a network in our brain called the “default mode network.” This is when our mind wanders and starts thinking more creatively. It’s during these moments that we come up with innovative ideas, daydream, or solve problems we’ve been stuck on.
The Hidden Benefits of Boredom
- Increased Creativity: When you're bored, your mind seeks stimulation, often leading to creative solutions or new ideas. Many creative breakthroughs happen during moments of stillness or idleness.
- Self-Reflection: Boredom provides a chance to reflect on your life, goals, and emotions. It allows space for deeper thoughts and introspection.
- Problem Solving: With nothing else to distract you, your brain starts working on unresolved problems or lingering ideas.
- Mental Rest: Constant entertainment can exhaust your brain. Boredom allows it to rest, recharge, and reset for future tasks.
How to Embrace Boredom
-
Unplug Regularly: Set aside time each day to disconnect from devices. Whether it’s a short walk, sitting quietly, or just staring out of the window, give your mind space to wander.
-
Mindfulness Practice: Being present in the moment, even when you're bored, can lead to a deeper appreciation of stillness. Try focusing on your breathing or surroundings during these times.
-
Embrace Daydreaming: Let your mind wander without judgment. Daydreaming can be a powerful tool for creativity and problem-solving.
-
Reflect & Journal: Use moments of boredom to write down thoughts or ideas. Journaling can help clarify your thoughts and provide insight into unresolved issues.
Conclusion
Instead of avoiding boredom, lean into it. It’s not just a void to fill, but an opportunity to discover new ideas, reflect on life, and tap into your creativity. In a world obsessed with constant entertainment, perhaps the key to deeper fulfillment lies in embracing the stillness boredom offers.
What do you think? Have you ever had a creative breakthrough during a moment of boredom? Share your thoughts in the comments below!
09/2024

Technology and Gadgets
Kotlin Control Statements
Control Statments
if
In Kotlin, if is an expression is which returns a value. It is used for control the flow of program structure. There is various type of if expression in Kotlin.
    if(condation){
    //code statement
    }

    // Syntax of traditional if else statement

    if(condation){
    //code statement
    }
    else{
    //code statement
    }

    // Kotlin if-else Expression

    val returnValue = if (condation) {
    //code statement
    } else {
    // code statement
    }
    println(returnValue)

    //

    // Ladder if example

    val grade: Char = if (marks in 91..100) {
        'A'
    } else if (marks in 81..90) {
        'B'
    } else if (marks in 71..80) {
        'B'
    } else {
        'F'
    }
When Expression
Kotlin, when expression is a conditional expression which returns the value. Kotlin, when expression is replacement of switch statement. Kotlin, when expression works as a switch statement of other language (Java, C++, C).
 val grade: Char = when (marks) {
        in 91..100 -> 'A'
        in 81..90 -> 'B'
        in 71..80 -> {
            println("testing")
            'C'
        }

        else -> {
            'F'
        }
    }


    println("Grade is $grade")
Programms
Loops
Repeat the statements n number of times
While

    var count = 1
    while (count <= 10)
    {
        // body statements
        println("durgesh $count")
        count++
    }

    println("Loop exited")
Do..While
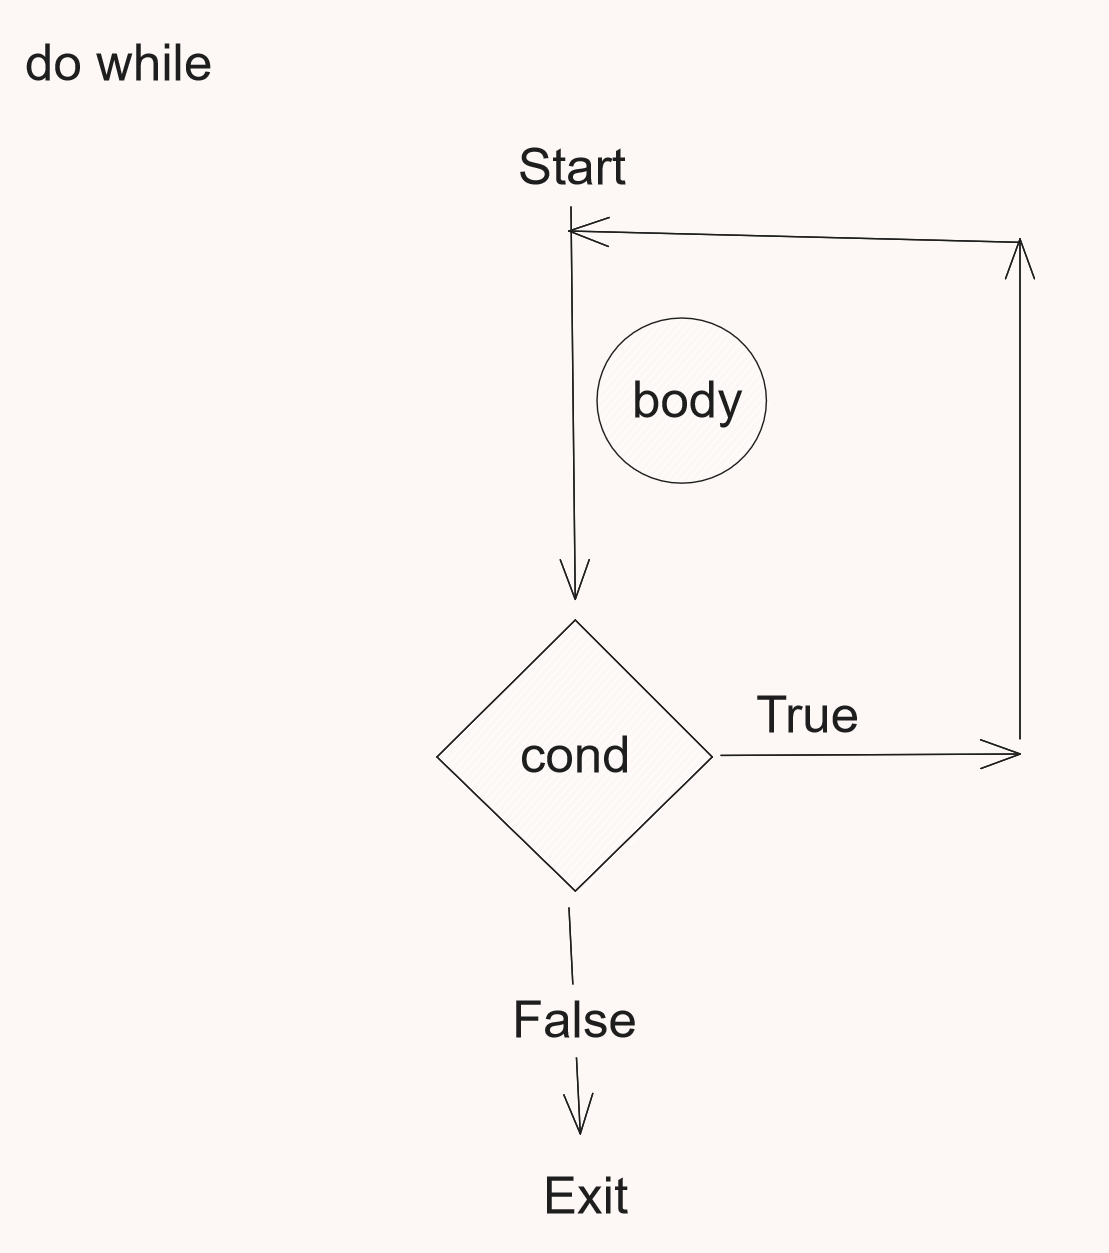
    var count = 1
    do {
        println("durgesh $count")
        count++
    } while (count <= 10);
For loop
    for (i in 10 downTo 1) {
        println(i)
    }

    for (i in 0..100 step 3) {
        println(i)
    }

    for (i in 1 ..9) {
        println("i = $i")
    }

     val favActivities: Array<String> = arrayOf("cricket", "chess", "music", "programming")
    for (activity in favActivities.reversed()) {
        println(activity)
    }
Watch First part
https://www.youtube.com/watch?v=1-LLZEGDOIc
Operators
Operators are the special symbols used to perform operations. eg +,-,>..
-
Arithmetic Operators
Perform methametical operations
| Operator | Example | Explanation | | -------- | ------- | ---------------- | | + | a+b | add two operands | | - | a-b | substract | | * | a*b | multiply | | / | a/b | Divide | | % | a%b | Modulus | | ++ | a++ | Increment | | -- | a-- | Decrement |
-
Assigment Operators
Assigns value to variable.
val a=5;
where = is assignment operator
We can use assignment and arthemetic operators togetter togetter the called Arithemetic Assignment Operators
| Operator | Example | Expansion | Explanation | | -------- | ------- | --------- | --------------------------------------- | | += | a+=b | a=a+b | Add a to b and then assign to a | | -= | a-=b | a=a-b | Substract b from a and then assign to a |
etc..
-
Comparison Operators
Compare two values
| Operator | Example | Explanation | | -------- | ------- | ------------------ | | == | a==b | Equal | | < | a<b | Less than | | > | a>b | Greater than | | <= | a<=b | Less than equal | | >= | a>=b | Greater than equal | | != | != | Not equal |
-
Logical Operators
Determain logic between to values
| Operator | Example | Explanation | | -------- | -------------------------- | --------------------------------------------- | | && | condition1 && condition2 | return true if both condition are true | | || | condition1 || condition2 | return true if any of two conditions are true | | ! | !a | reverse the result |
Hard Keywords
-
as
is used for type casts.
  val ob: Any ="Testing"
  val test=ob as String
specifies an alias for an import
import java.util.ArrayList as SubstringList -
in
specifies the object being iterated in a for loop.
for(i in 1..10)
{

}
is used as an infix operator to check that a value belongs to a range, a collection, or another entity that defines a 'contains' method.
if(i in  collection)
{

}
is used in when expressions for the same purpose.
marks a type parameter as contravariant.
   interface Demo<in T>
    {
        // T is only consumed never produced
    }
-
is
checks that a value has a certain type.
is used in when expressions for the same purpose.
-
typealias
for type aliasing
typealias DkSet = Set<String>Do read : https://kotlinlang.org/docs/keyword-reference.html
Smart Typecasting( Smart Cast )
Kotlin convert types automatically if itcheck the type with is keyword in if condition.
fun test(value: Any) {

    if (value is String) {
        print(value.length)
    } else {
        print(value)
    }

}
Functions in Kotlin
Set of statements written for doing a specific task.
Function has name, return type , parameters and modifiers.
how to define function in kotlin
fun keyword is used to defined function in kotlin
fun [functionName] ([parameter]) : [retunType]
{

//body of the  function

return [Value]

}


//example

fun myFun(n1:Int, n2:Int):Int
{
    return n1+n2
}
using the functions
Function can be used when we call the function
val result=myFun(2,5)
Default Argument
fun myFun(
    b: ByteArray,
    off: Int = 0,
    len: Int = b.size,
) { /*...*/ }
Name argument
We can use name when calling
myFun(

off=4,
b=arr,
len=45

)
Lambda
Kotlin functions are the first class which means they can be stored in variables , passed as an argument , returned from another functions .
The function that takes another function as parameter or return another function is called Higher order functions.
fun highOrder(value: () -> Unit, intValue: Int): () -> Unit {

    value()

    return value
}
Varargs
09/2024

Technology and Gadgets
Basics of Kotlin
Module 2: Basics of Kotlin
Variables and Data Types
- Kotlin variables refer to memory location to store data
- It is container which holds values
- data of the variables can be changes and reused in program
var name = "Learn Code With Durgesh"
val action = "Subscribe"
val vs. var
- var type variabels are mutable can be changed
  var name="Learn Code With Durgesh"
  name="Follow "//Success
- val types of variables are immutable cannot be changed
 val name="Learn Code With Durgesh"
 name="Follow "//Error
Data Types
-Data types represent the type of data variabels holds.
-
Number
Hold any type of numeric values. Numbers can be of two types
- Integers(Byte-1bytes, Short-2Bytes, Int-4Bytes ,Long-8Bytes)
- Floating Point(Float-4Bytes, Double-8Bytes)
-
Character
In kotlin char represented by Char keywords 2Bytes
-
Boolean
true/false - 1bit
-
Array
Represendted by Kotlin Array class and can be created using function arrayOf() and Array() constructor.
-
String
In Kotlin String is represented by String class.
Set of character is a string.
"This is simple string"
""" This is raw string """
Type inference
When be create and assign variables instantly the there is not need to provide the type type is infered by compiler.
val name = "Durges sir"
Type Conversion
There are helper functions that helps us to convert one type value into another type
toByte()
toShort()
toInt()
toLong()
toFloat()
toDouble()
toChar()
Example
var value1=50
var value2:Long=value1.toLong()
-
Basic Operators
-
Arithmetic operators
+, -, *, /, %
-
Comparison operators
, <, >=, <=, !=, ==
-
Logical operators
&&, ||, !
-
Input/Output
-
readln() and readLine() functions is used to take inpout
-
print() and println() functions are used to print on console
-
09/2024

Technology and Gadgets
Why Kotlin for android development
Module 1: Introduction to Kotlin
What is Kotlin?
-
Kotlin is developed by Jetbrains. Offically relased in 2016
-
Kotlin is a statically-typed, general-purpose programming language. It is widely used to develop android applications.
-
It runs on JVM so it can be run anywhere java can runs.
-
Used to developed
- Android Apps
- Server Side Apps
- and much more
Why Kotlin?
-
Kotlin removes boilerplate codes from java.
-
It provides many features more than jvms based languages.
-
Concise
-
Null Safty
-
Interportability
-
Toolfriendly
-
And much more.
-
Use playground: https://play.kotlinlang.org
-
Setting up the development environment (IDE, SDK, etc.)
-
To run programs without IDE just install java and install kotlin compiler. Kolin Compiler Link: (img)[https://github.com/JetBrains/kotlin/releases/tag/v1.2.21]
-
Set the path
-
now write kotlin program and save the program with .kt file extension
-
fun main(){
    println("First program")
}
- Now compile and run kotlin program with given command
//compile
kotlinc filename.kt -include-runtime -d hello.jar
//run
java -jar hello.jar
09/2024

Technology and Gadgets
01: Introduction to React JS
What is React.js?
React.js is a popular JavaScript library used for building user interfaces. It's a component-based framework, meaning you break down your UI into reusable components, making it easier to manage and scale your applications.
Key Features of React.js
- Component-Based Architecture: Encourages modular and reusable code.
- JSX: A syntax extension for JavaScript that allows you to write HTML-like structures within your JavaScript code.
- Virtual DOM: A lightweight copy of the actual DOM, which helps React efficiently update the UI.
- State and Props: Mechanisms for managing data and passing it between components.
Why Choose React.js?
- Declarative Syntax: You describe what you want the UI to look like, and React handles the updates.
- Large Community and Ecosystem: A vast community of developers contributes to libraries, tools, and resources.
- Performance Optimization: React's virtual DOM and efficient updates lead to better performance.
- Flexibility: Can be used for both web and mobile applications.
Getting Started with React.js
To start using React, you'll need a basic understanding of JavaScript and HTML. Here's a simple example of a React component: JavaScript
import React from 'react';

function Greeting(props) {
  return (
    <div>
      <h1>Hello, {props.name}!</h1>
    </div>
  );
}

export default Greeting;
Use code with caution.
In this example, we create a Greeting component that takes a name prop and renders a simple greeting message.
JSX is a syntax extension for JavaScript that allows you to write HTML-like structures within your JavaScript code. It provides a more intuitive way to define the structure of your React components.
How JSX Works
- Syntax: JSX looks very similar to HTML, but it's actually a JavaScript expression.
- Compilation: When your code is compiled, JSX elements are transformed into regular JavaScript function calls.
- Embedding JavaScript: You can embed JavaScript expressions directly within JSX elements using curly braces
{}.
Example
Here's a simple example of a JSX element: JavaScript
const element = (
  <h1>Hello, world!</h1>
);
Use code with caution.
This JSX code is equivalent to: JavaScript
const element = React.createElement('h1', null, 'Hello, world!');
Use code with caution.
As you can see, JSX simplifies the process of creating elements. Key Features of JSX
- Embedding Expressions: You can embed JavaScript expressions within JSX elements to dynamically render content. For example:
JavaScript
const name = 'Alice';
const element = <h1>Hello, {name}!</h1>;
Use code with caution.
- Conditional Rendering: You can use conditional statements within JSX to render different content based on conditions:
JavaScript
const isLoggedIn = true;
const element = (
  isLoggedIn ? <h1>Welcome back!</h1> : <h1>Please log in.</h1>
);

Use code with caution.

    Lists: You can render lists of elements using JSX:

JavaScript

const numbers = [1, 2, 3];
const list = (
  <ul>
    {numbers.map(number => (
      <li key={number}>{number}</li>
    ))}
  </ul>
);
Use code with caution.
In essence, JSX provides a more readable and intuitive way to define your React components, making it easier to write and maintain your code.
09/2024

Technology and Gadgets
ChatGPT vs Gemini Ai
ChatGPT vs. Gemini: A Comparative Analysis
In the realm of conversational AI, two prominent models are often discussed: OpenAI's ChatGPT and Google's Gemini. Both represent cutting-edge advancements in natural language processing, but they have different architectures, features, and use cases. This post provides a comparative analysis of ChatGPT and Gemini, helping you understand their strengths and applications.
What is ChatGPT?
ChatGPT is a conversational AI model developed by OpenAI. It is designed to generate human-like text based on the input it receives. Leveraging the GPT-4 architecture, ChatGPT excels in natural language understanding and generation, making it a popular choice for various applications.
Key Features of ChatGPT
- Conversational Abilities: ChatGPT is adept at generating coherent and contextually relevant responses in a conversational setting.
- Versatility: It can handle a wide range of topics and generate responses in various styles, from casual chat to formal explanations.
- Customizable: Users can fine-tune ChatGPT for specific tasks or industries, making it adaptable to different use cases.
- Integration: ChatGPT is integrated into various platforms and tools, including customer support systems, educational applications, and creative writing aids.
Use Cases
- Customer Support: Automating responses and assisting with queries.
- Content Creation: Generating text for blogs, articles, and marketing materials.
- Education: Providing tutoring and answering questions on various subjects.
- Entertainment: Engaging users in interactive storytelling and games.
What is Gemini?
Gemini is a conversational AI model developed by Google, part of Google's AI research and development efforts. It represents a significant advancement in natural language understanding and generation, incorporating innovations from Google's extensive research in AI.
Key Features of Gemini
- Advanced Language Understanding: Gemini leverages Google's latest research to offer high-quality language understanding and generation.
- Integration with Google Services: Gemini is designed to integrate seamlessly with Google's ecosystem, including search, knowledge graphs, and other AI-powered tools.
- Contextual Awareness: Gemini excels in maintaining context and coherence in conversations, leveraging deep learning techniques to improve response accuracy.
- Customizable Interactions: It offers customizable responses and can be tailored for specific applications, similar to ChatGPT.
Use Cases
- Search Enhancement: Improving search queries and providing detailed answers.
- Productivity Tools: Enhancing tools like Google Docs and Google Assistant with advanced conversational capabilities.
- Customer Interaction: Assisting with queries and providing support through Google’s various platforms.
- Research and Development: Facilitating advanced research through natural language understanding.
Comparing ChatGPT and Gemini
1. Architecture and Technology
- ChatGPT: Based on OpenAI's GPT-4 architecture, ChatGPT focuses on conversational abilities and versatile text generation.
- Gemini: Utilizes Google's latest advancements in AI, incorporating innovations from Google’s research and integration with its ecosystem.
2. Integration and Ecosystem
- ChatGPT: Integrated into various platforms and tools, offering flexibility in deployment across different industries.
- Gemini: Seamlessly integrates with Google’s services and products, providing enhanced functionality within Google's ecosystem.
3. Customization and Adaptability
- ChatGPT: Highly customizable for different applications and industries, allowing for fine-tuning and specific task adaptation.
- Gemini: Also customizable, with a focus on integration with Google’s services and improved contextual understanding.
4. Conversational Quality
- ChatGPT: Known for its coherent and contextually relevant responses, with a focus on maintaining conversational flow.
- Gemini: Excels in maintaining context and coherence, benefiting from Google’s extensive research in natural language processing.
Conclusion
Both ChatGPT and Gemini represent significant advancements in conversational AI, each with its own strengths and applications. ChatGPT, developed by OpenAI, offers versatile conversational abilities and wide integration options, while Gemini, developed by Google, leverages cutting-edge research and integration with Google’s ecosystem.
Choosing between ChatGPT and Gemini depends on your specific needs, such as the desired level of integration, customization, and the specific use cases you are targeting. Both models offer powerful capabilities, and understanding their differences can help you select the best tool for your applications.
Happy exploring!
09/2024

Technology and Gadgets
C Language
Welcome to this comprehensive C programming tutorial! Whether you're a complete beginner or looking to deepen your understanding of C, this guide will take you through the fundamentals and introduce advanced concepts as you progress.
Introduction to C
C is a powerful general-purpose programming language that is widely used in system programming, embedded systems, and applications requiring high performance. It is known for its efficiency, close-to-hardware control, and portability, making it a crucial language in the software industry.
Why Learn C?
- Foundation for Other Languages: C provides the building blocks for many modern languages, such as C++, Java, and Python.
- Performance: C is highly efficient and is used in performance-critical applications.
- Low-level Control: C allows you to work closely with memory and hardware, providing more control over system resources.
Setting Up C
To get started with C programming, you'll need to set up a development environment. Here are the steps:
- Install a C Compiler: You can use GCC (GNU Compiler Collection) for Linux/macOS or MinGW for Windows. Both are free and widely used.
- Choose an IDE/Text Editor: Popular options include Visual Studio Code, Code::Blocks, or Eclipse. Alternatively, you can use a simple text editor like Sublime Text.
- Verify Installation: Once the compiler is installed, verify it by typing
gcc --versionin the terminal or command prompt.
C Basics
Now that your environment is set up, let’s start with the basics. In this section, we'll cover:
- Variables and Data Types: Learn how to declare and use variables in C.
- Control Structures: Understand how to use conditional statements and loops.
- Functions: Learn how to write reusable code blocks.
Variables and Data Types
#include <stdio.h>

int main() {
    int age = 25;
    float height = 5.9;
    char initial = 'A';

    printf("Age: %d, Height: %.1f, Initial: %c\n", age, height, initial);
    return 0;
}
Control Structures
#include <stdio.h>

int main() {
    int age = 20;

    if (age >= 18) {
        printf("You are an adult.\n");
    } else {
        printf("You are a minor.\n");
    }

    for (int i = 0; i < 5; i++) {
        printf("Count: %d\n", i);
    }

    return 0;
}
Functions
#include <stdio.h>

void greet(char name[]) {
    printf("Hello, %s!\n", name);
}

int main() {
    greet("Alice");
    return 0;
}
Intermediate C
Once you are familiar with the basics, it's time to explore more advanced features of C:
- Arrays and Pointers: Learn how to work with arrays and pointers, which are fundamental in C programming.
- File I/O: Understand how to read from and write to files.
- Dynamic Memory Allocation: Explore memory management using
malloc,calloc, andfree.
Arrays and Pointers
#include <stdio.h>

int main() {
    int numbers[5] = {1, 2, 3, 4, 5};
    int *ptr = numbers;

    for (int i = 0; i < 5; i++) {
        printf("Number: %d, Address: %p\n", *(ptr + i), (ptr + i));
    }

    return 0;
}
File I/O
#include <stdio.h>

int main() {
    FILE *file = fopen("example.txt", "w");
    if (file == NULL) {
        printf("Error opening file!\n");
        return 1;
    }

    fprintf(file, "Hello, File!\n");
    fclose(file);

    return 0;
}
Dynamic Memory Allocation
#include <stdio.h>
#include <stdlib.h>

int main() {
    int *arr;
    int size = 5;

    arr = (int*) malloc(size * sizeof(int));

    for (int i = 0; i < size; i++) {
        arr[i] = i + 1;
        printf("Value: %d\n", arr[i]);
    }

    free(arr);

    return 0;
}
Advanced C
Now that you are comfortable with intermediate topics, let’s move on to some advanced C programming concepts:
- Structures: Learn how to group different data types together.
- Pointers to Functions: Explore how to use pointers with functions for flexibility.
- Memory Management: Delve deeper into memory management and optimization.
Structures
#include <stdio.h>

struct Student {
    char name[50];
    int age;
    float grade;
};

int main() {
    struct Student s1 = {"Alice", 20, 85.5};

    printf("Name: %s, Age: %d, Grade: %.2f\n", s1.name, s1.age, s1.grade);
    return 0;
}
Pointers to Functions
#include <stdio.h>

void add(int a, int b) {
    printf("Sum: %d\n", a + b);
}

int main() {
    void (*func_ptr)(int, int) = &add;
    func_ptr(10, 20);

    return 0;
}
Memory Management
#include <stdio.h>
#include <stdlib.h>

int main() {
    int *arr;
    int size = 10;

    arr = (int*) malloc(size * sizeof(int));

    if (arr == NULL) {
        printf("Memory not allocated.\n");
        return 1;
    }

    for (int i = 0; i < size; i++) {
        arr[i] = i * 2;
        printf("Value: %d\n", arr[i]);
    }

    free(arr);

    return 0;
}
Conclusion
Congratulations on making it through this C programming tutorial! You’ve covered everything from the basics of C to advanced topics like structures and memory management. Keep practicing and exploring the vast capabilities of C to enhance your programming skills.
Happy coding!
09/2024